Sorting Contours using Python and OpenCV
Alright, so at this point you have been exposed to contours pretty heavily on the PyImageSearch blog.
We used contours to build a kick-ass mobile document scanner.
Contours enabled us detect barcodes in images.
And we even leveraged the power of contours to find the distance from a camera to object or marker.
But there still remains a sticking question that we have not addressed: how in the world do we sort contours from left-to-right, top-to-bottom, etc.
Oddly enough OpenCV does not provide a built-in function or method to perform the actual sorting of contours.
But no worries.
In the rest of this blog you’ll be sorting contours using Python and OpenCV like a pro.
Read on to find out more…
OpenCV and Python versions:
In order to run this example, you’ll need Python 2.7 and OpenCV 2.4.X.
By the end of this blog article you’ll be able to:
-
Sort contours according to their size/area, along with a template to follow to sort contours by any other arbitrary criteria.
-
Sort contoured regions from left-to-right, right-to-left, top-to-bottom, and bottom-to-top using only a single function.
So let’s go ahead and get started. Open up your favorite code editor, name it
sorting_contours.py and let’s get started: → Launch Jupyter Notebook on Google Colab
Sorting Contours using Python and OpenCV
# import the necessary packages
def sort_contours(cnts, method="left-to-right"):
# initialize the reverse flag and sort index
# handle if we need to sort in reverse
if method == "right-to-left" or method == "bottom-to-top":
# handle if we are sorting against the y-coordinate rather than
# the x-coordinate of the bounding box
if method == "top-to-bottom" or method == "bottom-to-top":
# construct the list of bounding boxes and sort them from top to
boundingBoxes = [cv2.boundingRect(c) for c in cnts]
(cnts, boundingBoxes) = zip(*sorted(zip(cnts, boundingBoxes),
key=lambda b:b[1][i], reverse=reverse))
# return the list of sorted contours and bounding boxes
return (cnts, boundingBoxes)
# import the necessary packages import numpy as np import argparse import imutils import cv2 def sort_contours(cnts, method="left-to-right"): # initialize the reverse flag and sort index reverse = False i = 0 # handle if we need to sort in reverse if method == "right-to-left" or method == "bottom-to-top": reverse = True # handle if we are sorting against the y-coordinate rather than # the x-coordinate of the bounding box if method == "top-to-bottom" or method == "bottom-to-top": i = 1 # construct the list of bounding boxes and sort them from top to # bottom boundingBoxes = [cv2.boundingRect(c) for c in cnts] (cnts, boundingBoxes) = zip(*sorted(zip(cnts, boundingBoxes), key=lambda b:b[1][i], reverse=reverse)) # return the list of sorted contours and bounding boxes return (cnts, boundingBoxes)
# import the necessary packages import numpy as np import argparse import imutils import cv2
def sort_contours(cnts, method="left-to-right"):
initialize the reverse flag and sort index
reverse = False i = 0
handle if we need to sort in reverse
if method == "right-to-left" or method == "bottom-to-top": reverse = True
handle if we are sorting against the y-coordinate rather than
the x-coordinate of the bounding box
if method == "top-to-bottom" or method == "bottom-to-top": i = 1
construct the list of bounding boxes and sort them from top to
bottom
boundingBoxes = [cv2.boundingRect(c) for c in cnts] (cnts, boundingBoxes) = zip(*sorted(zip(cnts, boundingBoxes), key=lambda b:b[1][i], reverse=reverse))
return the list of sorted contours and bounding boxes
return (cnts, boundingBoxes)
We’ll start off by importing our necessary packages: NumPy for numerical processing,
argparse to parse our command line arguments, and cv2 for our OpenCV bindings.
Instead of starting off by parsing arguments, loading images, and taking care of other normal procedures, let’s skip these steps for the time being and jump immediately in to defining our
sort_contours function which will enable us to sort our contours.
The actual
sort_contours function is defined on Line 7 and takes two arguments. The first is cnts , the list of contours that the we want to sort, and the second is the sorting method , which indicates the direction in which we are going to sort our contours (i.e. left-to-right, top-to-bottom, etc.).
From there we’ll initialize two important variables on Lines 9 and 10. These variables simply indicate the sorting order (ascending or descending) and the index of the bounding box we are going to use to perform the sort (more on that later). We’ll initialize these variables to sort in ascending order and along to the x-axis location of the bounding box of the contour.
If we are sorting right-to-left or bottom-to-top, we’ll need to sort in descending order, according to the location of the contour in the image (Lines 13 and 14).
Similarly, on Lines 18 and 19 we check to see if we are sorting from top-to-bottom or bottom-to-top. If this is the case, then we need to sort according to the y-axis value rather than the x-axis (since we are now sorting vertically rather than horizontally).
The actual sorting of the contours happens on Lines 23-25.
We first compute the bounding boxes of each contour, which is simply the starting (x, y)-coordinates of the bounding box followed by the width and height (hence the term “bounding box”). (Line 23)
The
boundingBoxes enable us to sort the actual contours, which we do on Line 24 and 25 using some Python magic that sorts two lists together. Using this code we are able to sort both the contours and bounding boxes according to the criteria that we provided.
Finally, we return the (now sorted) list of bounding boxes and contours to the calling function on Line 28.
While we’re at it, let’s go ahead and define another helper function,
draw_contour : → Launch Jupyter Notebook on Google Colab
Sorting Contours using Python and OpenCV
def draw_contour(image, c, i):
# compute the center of the contour area and draw a circle
# representing the center
cX = int(M["m10"] / M["m00"])
cY = int(M["m01"] / M["m00"])
# draw the countour number on the image
cv2.putText(image, "#{}".format(i + 1), (cX - 20, cY), cv2.FONT_HERSHEY_SIMPLEX,
# return the image with the contour number drawn on it
def draw_contour(image, c, i): # compute the center of the contour area and draw a circle # representing the center M = cv2.moments(c) cX = int(M["m10"] / M["m00"]) cY = int(M["m01"] / M["m00"]) # draw the countour number on the image cv2.putText(image, "#{}".format(i + 1), (cX - 20, cY), cv2.FONT_HERSHEY_SIMPLEX, 1.0, (255, 255, 255), 2) # return the image with the contour number drawn on it return image
def draw_contour(image, c, i):
compute the center of the contour area and draw a circle
representing the center
M = cv2.moments(c) cX = int(M["m10"] / M["m00"]) cY = int(M["m01"] / M["m00"])
draw the countour number on the image
cv2.putText(image, "#{}".format(i + 1), (cX - 20, cY), cv2.FONT_HERSHEY_SIMPLEX, 1.0, (255, 255, 255), 2)
return the image with the contour number drawn on it
return image
This function simply computes the center (x, y)-coordinate of the supplied contour
c on Lines 33-35 and then uses the center coordinates to draw the contour ID, i , on Lines 38 and 39.
Finally, the passed in
image is returned to the calling function on Line 42.
Again, this is simply a helper function that we’ll leverage to draw contour ID numbers on our actual image so we can visualize the results of our work.
Now that the helper functions are done, let’s put the driver code in place to take our actual image, detect contours, and sort them:
→ Launch Jupyter Notebook on Google Colab
Sorting Contours using Python and OpenCV
# construct the argument parser and parse the arguments
ap = argparse.ArgumentParser()
ap.add_argument("-i", "--image", required=True, help="Path to the input image")
ap.add_argument("-m", "--method", required=True, help="Sorting method")
args = vars(ap.parse_args())
# load the image and initialize the accumulated edge image
image = cv2.imread(args["image"])
accumEdged = np.zeros(image.shape[:2], dtype="uint8")
# loop over the blue, green, and red channels, respectively
for chan in cv2.split(image):
# blur the channel, extract edges from it, and accumulate the set
chan = cv2.medianBlur(chan, 11)
edged = cv2.Canny(chan, 50, 200)
accumEdged = cv2.bitwise_or(accumEdged, edged)
# show the accumulated edge map
cv2.imshow("Edge Map", accumEdged)
# construct the argument parser and parse the arguments ap = argparse.ArgumentParser() ap.add_argument("-i", "--image", required=True, help="Path to the input image") ap.add_argument("-m", "--method", required=True, help="Sorting method") args = vars(ap.parse_args()) # load the image and initialize the accumulated edge image image = cv2.imread(args["image"]) accumEdged = np.zeros(image.shape[:2], dtype="uint8") # loop over the blue, green, and red channels, respectively for chan in cv2.split(image): # blur the channel, extract edges from it, and accumulate the set # of edges for the image chan = cv2.medianBlur(chan, 11) edged = cv2.Canny(chan, 50, 200) accumEdged = cv2.bitwise_or(accumEdged, edged) # show the accumulated edge map cv2.imshow("Edge Map", accumEdged)
# construct the argument parser and parse the arguments ap = argparse.ArgumentParser() ap.add_argument("-i", "--image", required=True, help="Path to the input image") ap.add_argument("-m", "--method", required=True, help="Sorting method") args = vars(ap.parse_args())
load the image and initialize the accumulated edge image
image = cv2.imread(args["image"]) accumEdged = np.zeros(image.shape[:2], dtype="uint8")
loop over the blue, green, and red channels, respectively
for chan in cv2.split(image):
blur the channel, extract edges from it, and accumulate the set
of edges for the image
chan = cv2.medianBlur(chan, 11) edged = cv2.Canny(chan, 50, 200) accumEdged = cv2.bitwise_or(accumEdged, edged)
show the accumulated edge map
cv2.imshow("Edge Map", accumEdged)
Lines 45-48 aren’t very interesting — they simply parse our command line arguments,
--image which is the path to where our image resides on disk, and --method which is a text representation of the direction in which we want to sort our contours.
From there we load our image off disk on Line 51 and allocate memory for the edge map on Line 52.
Constructing the actual edge map happens on Lines 55-60, where we loop over each Blue, Green, and Red channel of the image (Line 55), blur each channel slightly to remove high frequency noise (Line 58), perform edge detection, (Line 59), and update the accumulated edge map on Line 60.
We display the accumulated edge map on line 63 which looks like this:
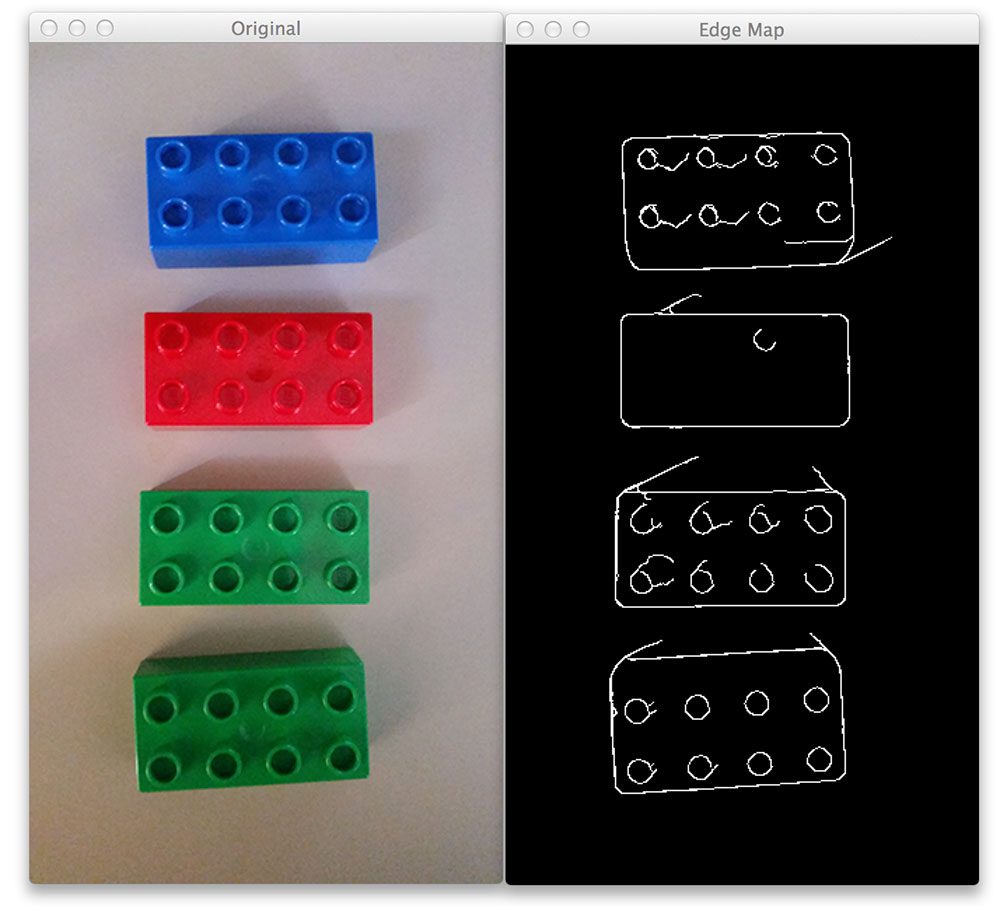
Figure 1: (Left) Our original image. (Right) The edge map of the Lego bricks.
As you can see, we have detected the actual edge outlines of the Lego bricks in the image.
Now, let’s see if we can (1) find the contours of these Lego bricks, and then (2) sort them:
→ Launch Jupyter Notebook on Google Colab
Sorting Contours using Python and OpenCV
# find contours in the accumulated image, keeping only the largest
cnts = cv2.findContours(accumEdged.copy(), cv2.RETR_EXTERNAL,
cnts = imutils.grab_contours(cnts)
cnts = sorted(cnts, key=cv2.contourArea, reverse=True)[:5]
# loop over the (unsorted) contours and draw them
for (i, c) in enumerate(cnts):
orig = draw_contour(orig, c, i)
# show the original, unsorted contour image
cv2.imshow("Unsorted", orig)
# sort the contours according to the provided method
(cnts, boundingBoxes) = sort_contours(cnts, method=args["method"])
# loop over the (now sorted) contours and draw them
for (i, c) in enumerate(cnts):
draw_contour(image, c, i)
cv2.imshow("Sorted", image)
# find contours in the accumulated image, keeping only the largest # ones cnts = cv2.findContours(accumEdged.copy(), cv2.RETR_EXTERNAL, cv2.CHAIN_APPROX_SIMPLE) cnts = imutils.grab_contours(cnts) cnts = sorted(cnts, key=cv2.contourArea, reverse=True)[:5] orig = image.copy() # loop over the (unsorted) contours and draw them for (i, c) in enumerate(cnts): orig = draw_contour(orig, c, i) # show the original, unsorted contour image cv2.imshow("Unsorted", orig) # sort the contours according to the provided method (cnts, boundingBoxes) = sort_contours(cnts, method=args["method"]) # loop over the (now sorted) contours and draw them for (i, c) in enumerate(cnts): draw_contour(image, c, i) # show the output image cv2.imshow("Sorted", image) cv2.waitKey(0)
# find contours in the accumulated image, keeping only the largest
ones
cnts = cv2.findContours(accumEdged.copy(), cv2.RETR_EXTERNAL, cv2.CHAIN_APPROX_SIMPLE) cnts = imutils.grab_contours(cnts) cnts = sorted(cnts, key=cv2.contourArea, reverse=True)[:5] orig = image.copy()
loop over the (unsorted) contours and draw them
for (i, c) in enumerate(cnts): orig = draw_contour(orig, c, i)
show the original, unsorted contour image
cv2.imshow("Unsorted", orig)
sort the contours according to the provided method
(cnts, boundingBoxes) = sort_contours(cnts, method=args["method"])
loop over the (now sorted) contours and draw them
for (i, c) in enumerate(cnts): draw_contour(image, c, i)
show the output image
cv2.imshow("Sorted", image) cv2.waitKey(0)
Quite obviously, the first step here is to find the actual contours in our accumulated edge map image on Line 67-69. We are looking for the external contours of the Lego bricks, which simply corresponds to their outlines.
Based on these contours, we are now going to sort them according to their size by using a combination of the Python
sorted function and the cv2.contourArea method — this allows us to sort our contours according to their area (i.e. size) from largest to smallest (Line 70).
We take these sorted contours (in terms of size, not location), loop over them on Line 74 and draw each individual contour on Line 76 using our
draw_contour helper function.
This image is then displayed to our screen on Line 78.
However, as you’ll notice, our contours have been sorted only according to their size — no attention has been paid to their actual location in the image.
We address this problem on Line 81 where we make a call to our custom
sort_contours function. This method accepts our list of contours along with sorting direction method (provided via command line argument) and sorts them, returning a tuple of sorted bounding boxes and contours, respectively.
Finally, we take these sorted contours, loop over them, draw each individual one, and finally display the output image to our screen (Lines 84-89).
Results
Let’s put our hard work to the test.
Open up a terminal, navigate to your source code and execute the following command:
→ Launch Jupyter Notebook on Google Colab
Sorting Contours using Python and OpenCV
$ python sorting_contours.py --image images/image_01.png --method "top-to-bottom"
$ python sorting_contours.py --image images/image_01.png --method "top-to-bottom"
$ python sorting_contours.py --image images/image_01.png --method "top-to-bottom"
Your output should look like this:
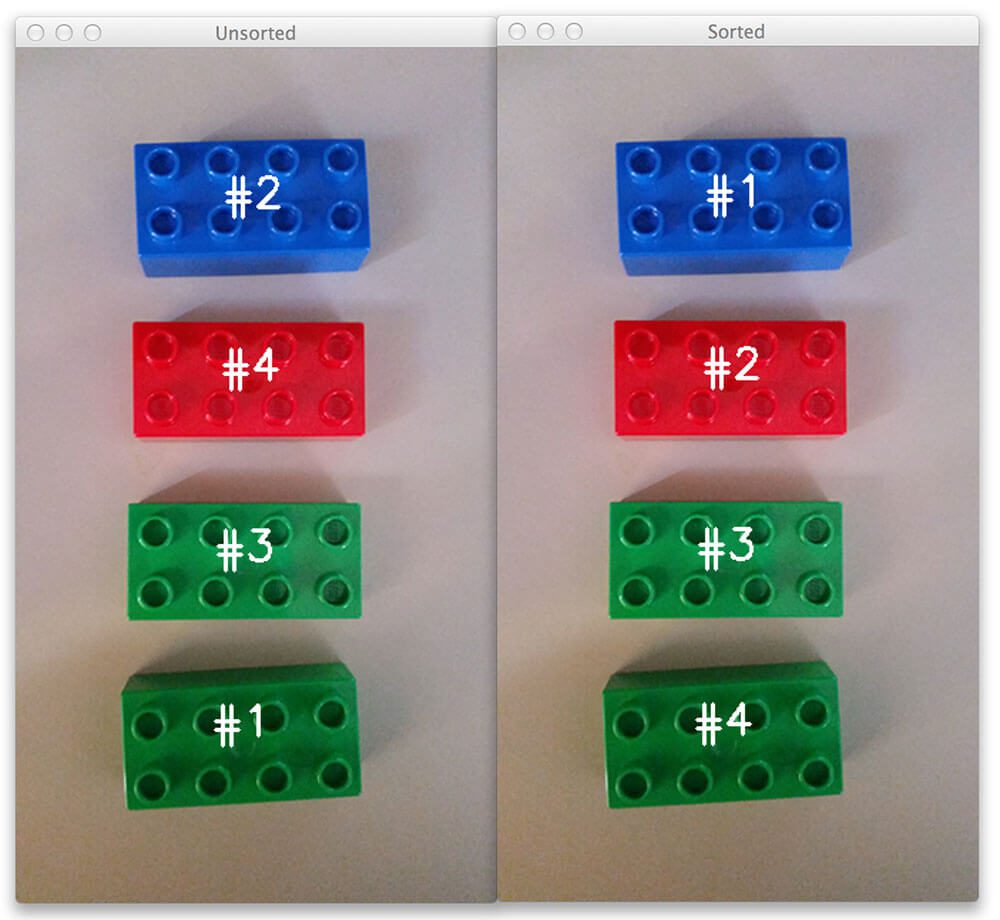
Figure 2: Sorting our Lego bricks from top-to-bottom.
On the left we have our original unsorted contours. Clearly, we can see that the contours are very much out of order — the first contour is appearing at the very bottom and the second contour at the very top!
However, by applying our
sorted_contours function we were able to sort our Lego bricks from top-to-bottom.
Let’s take a look at another example.
→ Launch Jupyter Notebook on Google Colab
Sorting Contours using Python and OpenCV
$ python sorting_contours.py --image images/image_01.png --method "bottom-to-top"
$ python sorting_contours.py --image images/image_01.png --method "bottom-to-top"
$ python sorting_contours.py --image images/image_01.png --method "bottom-to-top"
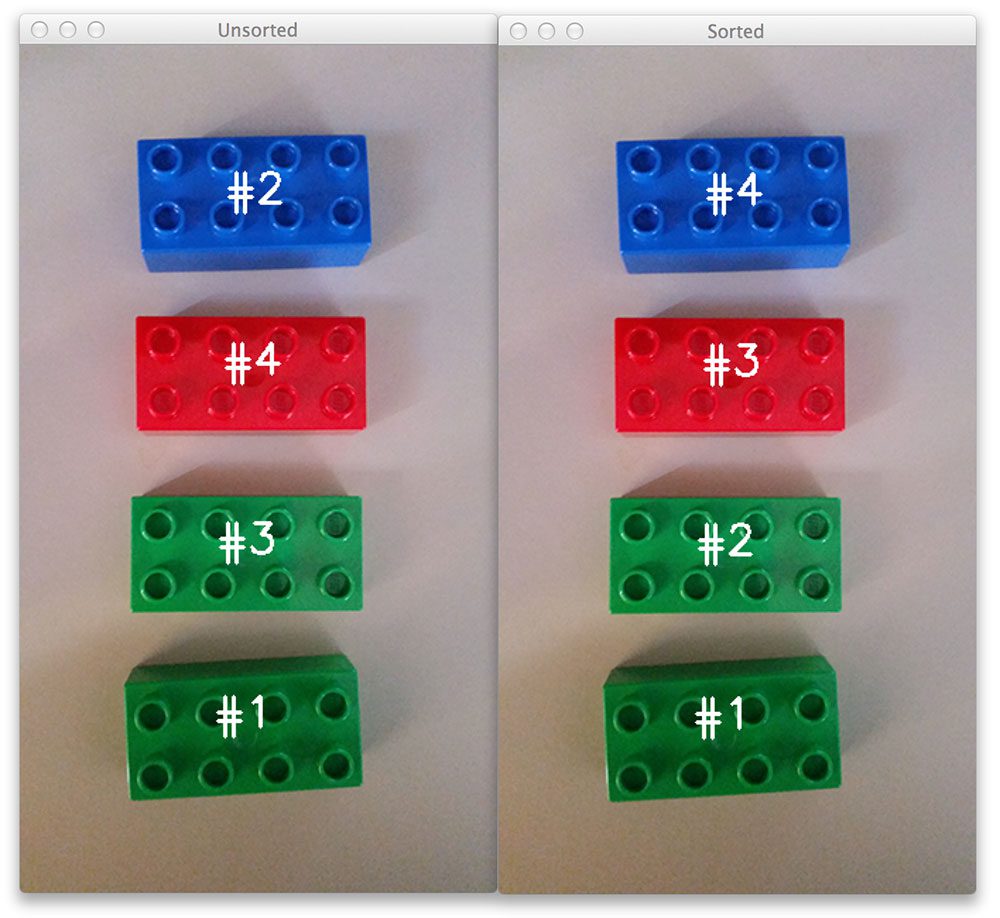
Figure 3: Sorting our contours from bottom-to-top.
And here we have sorted on contours from bottom-to-top.
Of course, we can also sort contours horizontally as well:
→ Launch Jupyter Notebook on Google Colab
Sorting Contours using Python and OpenCV
$ python sorting_contours.py --image images/image_02.png --method "left-to-right"
$ python sorting_contours.py --image images/image_02.png --method "left-to-right"
$ python sorting_contours.py --image images/image_02.png --method "left-to-right"
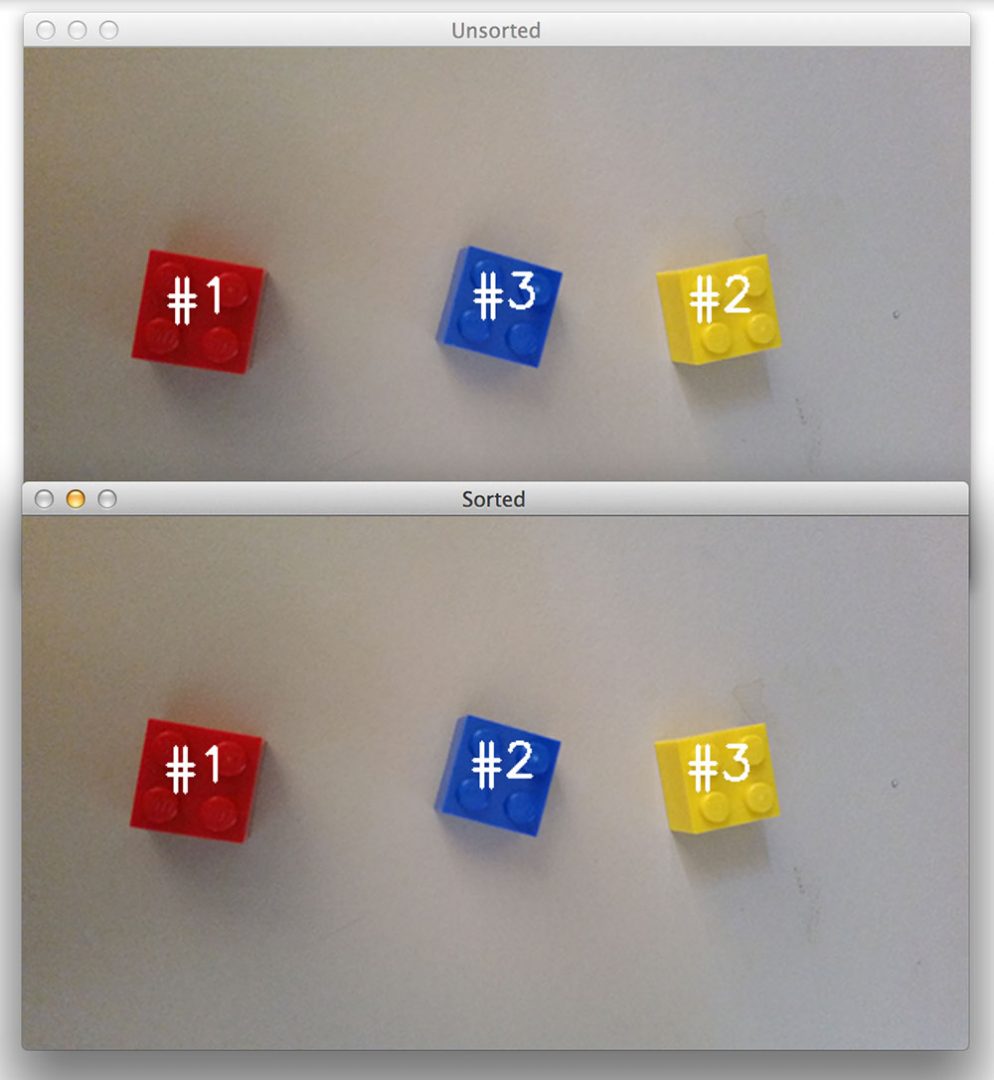
Figure 4: Sorting our contours from left-to-right.
Again, in the top image our contours are not in order. But in the bottom image we are able to successfully sort our contours without an issue.
One last example:
→ Launch Jupyter Notebook on Google Colab
Sorting Contours using Python and OpenCV
$ python sorting_contours.py --image images/image_02.png --method "right-to-left"
$ python sorting_contours.py --image images/image_02.png --method "right-to-left"
$ python sorting_contours.py --image images/image_02.png --method "right-to-left"
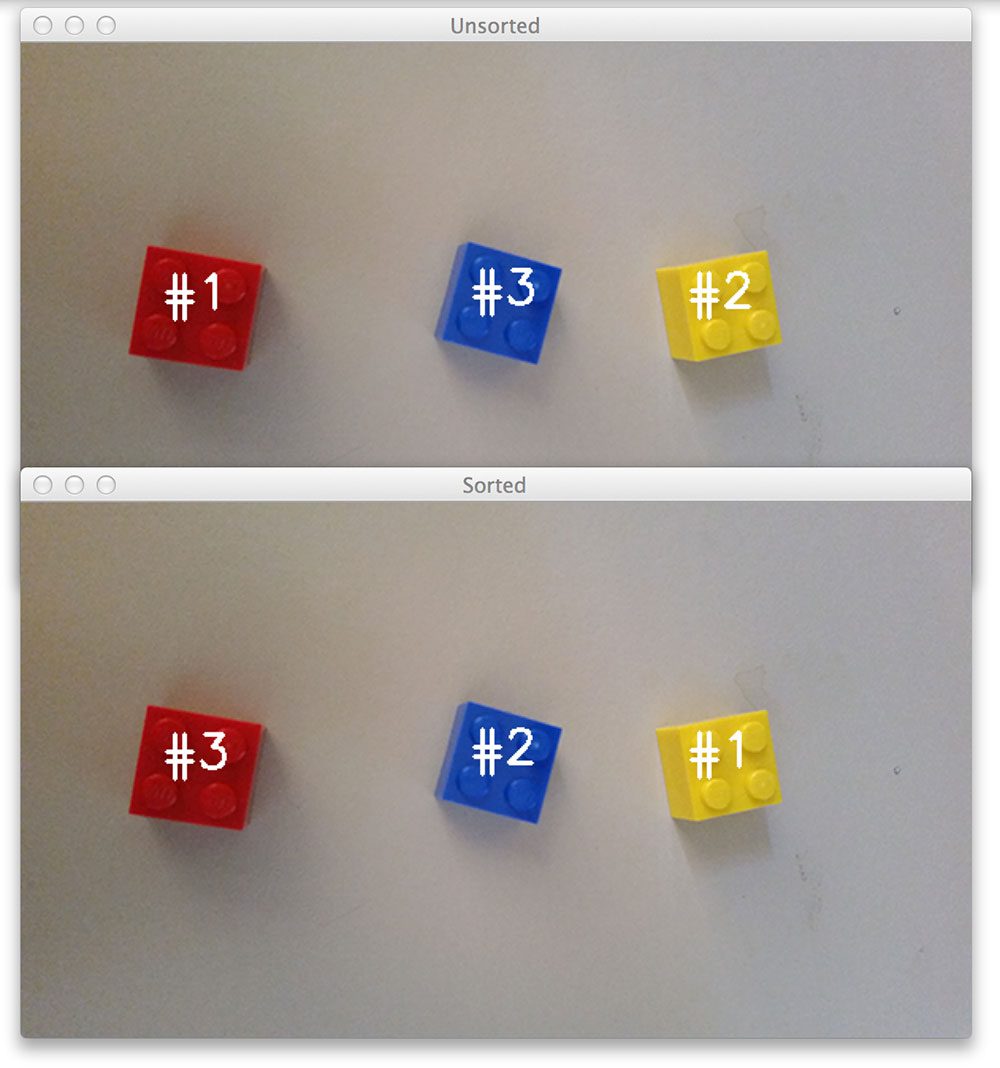
Figure 5: Sorting our contours from right-to-left.
As you can see, there’s nothing to it — we’re simply leveraging the bounding box of each object in the image to sort the contours by direction using Python and OpenCV.
In the future all you need is our trusty
sorted_contours function and you’ll always be able to sort contours in terms of direction without a problem.


Course information: 28 total classes • 39h 44m video • Last updated: 10/2021
★★★★★ 4.84 (128 Ratings) • 3,000+ Students Enrolled
I strongly believe that if you had the right teacher you could master computer vision and deep learning.
Do you think learning computer vision and deep learning has to be time-consuming, overwhelming, and complicated? Or has to involve complex mathematics and equations? Or requires a degree in computer science?
That’s not the case.
All you need to master computer vision and deep learning is for someone to explain things to you in simple, intuitive terms. And that’s exactly what I do. My mission is to change education and how complex Artificial Intelligence topics are taught.
If you're serious about learning computer vision, your next stop should be PyImageSearch University, the most comprehensive computer vision, deep learning, and OpenCV course online today. Here you’ll learn how to successfully and confidently apply computer vision to your work, research, and projects. Join me in computer vision mastery.
Inside PyImageSearch University you'll find:
- ✓ 28 courses on essential computer vision, deep learning, and OpenCV topics
- ✓ 28 Certificates of Completion
- ✓ 39h 44m on-demand video
- ✓ Brand new courses released every month, ensuring you can keep up with state-of-the-art techniques
- ✓ Pre-configured Jupyter Notebooks in Google Colab
- ✓ Run all code examples in your web browser — works on Windows, macOS, and Linux (no dev environment configuration required!)
- ✓ Access to centralized code repos for all 400+ tutorials on PyImageSearch
- ✓ Easy one-click downloads for code, datasets, pre-trained models, etc.
- ✓ Access on mobile, laptop, desktop, etc.
Click here to join PyImageSearch University
Summary
In this blog article we learned how to sort contours from left-to-right, right-to-left, top-to-bottom, and bottom-to-top.
Realistically, we only needed to leverage two key functions.
The first critical function was the
cv2.boundingRect method which computes the bounding box region of the contour. And based on these bounding boxes, we leveraged some Python magic and used our second critical function, sorted , to actually “sort” these bounding boxes in the direction we want.
And that’s all there is to it!
If you would like to play with the examples included in this post, just enter your email address in the form below and I’ll email you the code instantly.

Hi there, I’m Adrian Rosebrock, PhD. All too often I see developers, students, and researchers wasting their time, studying the wrong things, and generally struggling to get started with Computer Vision, Deep Learning, and OpenCV. I created this website to show you what I believe is the best possible way to get your start.
Where contours are created. I couldn’t get how to sort the contours.