


How we built a custom permissions DSL at Figma


When our permissions system came apart at the seams, everything came to a halt. This is the story of how we fixed it while improving performance, accuracy, and developer ergonomics.
Collaboration is core to Figma. It’s why we built Figma on the web, and why multiplayer is such an important part of the Figma editor. This focus on collaboration also means that our permissions rules are complex—deceptively so. In early 2021, the engineering team encountered a number of bugs, support tickets, and delayed projects rooted in this complexity. The challenge? We had to rethink the technical foundations of our permissions engine to make sure that engineers could add, modify, and remove rules without worrying about breaking something.
When it comes to the “build” versus “buy” debate, we tend to bias towards using existing open source or off-the-shelf solutions. In this case, we opted to create our own permissions domain specific language (DSL), a custom cross-platform logic engine, and migrate all our most important permissions rules into this system.
Permissions and authorization at Figma
Before getting into why we arrived at this solution, it’s important to understand how this connects to the Figma user experience. Let’s start with what we call the “share” modal. This is certainly not the only place where permissions are used, but it’s one of the most visible and one of the most complex.
When you click on the “Share” button in a Figma file, the share modal pops up, which controls who can access the file and their corresponding level of authorship. There are two main ways to access a file: through a role and through a link. Roles are hierarchical, so you might have access to the file through your role on a parent folder, team, or organization. We have corresponding rules around when that access is blocked or allowed depending on the state of each of these containers and the user’s role. Link access can also have different rules limiting who can access the file, what type of access they have, for how long, if they need a password, or even if the file’s parent organization imposes limitations on how that file can be shared.
In the early days, all of Figma’s backend business logic—including permissions—lived in a Ruby monolith application that used ActiveRecord, the most popular Object Relational Mapper (ORM) for Ruby. Almost all of our business logic consisted of simple HTTP endpoints with ActiveRecord calls. ActiveRecord models had a has_access? method which defined the logic by which a user (only one!) had access to a particular resource. This one method served as the foundation for access control in our backend application, and was nothing more than a function with “if/else” statements that made database calls and returned a boolean. This function handled things like deleted files, hierarchical access, all the different types of link access, org restrictions, billing rules, and many others. To make sure that a user had access to a particular resource, product engineers then needed to call this function at the right time in their controllers. While this simple setup worked well for a long time, it became clear we had outgrown it.
Over time, engineers spoke up about how difficult it was to work with permissions. This prompted an in-depth investigation, which allowed us to align on four key problems to solve.
Problem 1: Unnecessary complexity and debugging difficulty
These has_access? methods were really long and complicated, with many optional parameters. Engineers were nervous to modify them. You would often hear suggestions like “Can we do that outside of has_access??” or “Why don’t we just do this in the client?” But a bug in these functions could leak access to every single file in Figma.
One interesting reason for this complexity was that, when debugging these functions, engineers were also debugging all the permissions logic for that resource simultaneously. There was no easy way to decouple that logic. As a result, it was hard for engineers to write new independent rules for their own features without having to think about all existing logic.
Debugging became complicated and time consuming, often consisting of adding dozens of print statements all over these functions, and requiring loading up on context for the entire body of permissions logic.
Problem 2: Hierarchical permissions
We found that even though we had a hierarchical system based on an integer value for permissions, engineers often introduced variations in these behaviors through boolean flags added to the has_access? methods. These methods would often look like this:
def has_access?(
   user,                          # T.nilable(User)
   level,                         # Integer
   ignore_link_access: false,     # Boolean
   org_candidate: false,          # Boolean
   ignore_archived_branch: false  # Boolean
 )
This meant that a user might have level 300 access (edit access), but might not have level 100 (view) + ignore_link_access: true access. This made for a very complicated mental model that was hard to grok and even harder to debug. Additionally, these flags varied from resource to resource. Engineers had to know about all these variations, what they meant, and when to consider them.
It became clear that we needed a more flexible system that allowed the creation of non-hierarchical, granular permissions that could be completely independent from each other. While there is some use to hierarchical permissions, we’d still want to go outside of the established hierarchy or create new ones.
Problem 3: Database load
Figma was growing. Quickly. With this growth came an increasing strain on our databases, and the database load from permissions checks comprised a huge percentage of this (around 20%). This was an existential problem since there were physical limitations to how big we could make our database. While the database team was working on vertical and horizontal sharding, we needed to ensure that we could provide backend engineers with more control over the data layer for permissions.

Figma engineer Tim Liang wrote about the growing pains of database architecture. Read his reflections.
When we started looking into this, we realized that, because has_access? was just a regular Ruby function with ActiveRecord calls, database querying and permissions logic were coupled together. There was no way to fix database queries without possibly changing permissions logic by mistake. If you were a backend engineer without intimate knowledge of permissions, it felt dangerous trying to change anything. We wanted a way to completely separate database queries and policy logic.
Problem 4: Multiple sources of truth
We needed to implement permissions across two systems: Sinatra (our HTTP backend) and LiveGraph, our realtime API layer. Whenever new permissions logic was introduced, engineers were instructed to make those changes in both of these codebases. In practice, many rules were not migrated properly and bugs resulted from the discrepancies between these two systems. We needed a way to allow engineers to write their policy logic once and have it work on both systems correctly.
Based on these four problems, we realized that whatever our solution was, it needed to:
- Allow engineers to write permissions rules without having to care about existing permissions rules. Decoupling these rules would make them easy to debug and modify.
- Have complete separation between policy logic and data loading. Policy authors should never have to worry about how their data is loaded or about optimizing their policies; backend engineers working on the permissions engine should not have to worry about policy logic.
- Be cross-platform. It needed to be able to work in Ruby, TypeScript, and any other language without introducing any additional work on the policy author.
- Allow for the creation of granular permissions to more precisely model what actions users could take on resources.
Policies: Initial insight and proof of concept
It was clear that we needed some sort of abstraction layer for declaring permissions rules. As inspiration for a declarative way to define permissions roles, we started looking into AWS IAM policies. IAM policies basically have a few main properties: a set of permissions or actions, an effect (allow or deny), a resource they apply to, and possibly some conditions by which that policy is applied. They’re typically written in JSON and look something like this:
{
    "Version": "2012–10–17",
    "Statement": {
        "Effect": "Allow",
        "Action": "EC2:*",
        "Resource": "*",
        "Condition": {
            "IpAddress": {
                "aws:SourceIp": [ "192.168.0.1" ]
            }
        }
    }
}
Now, let’s be clear: AWS IAM policies are notoriously hard to work with and are definitely not universally loved. But for us, they provide granularity and isolation, a key part of our system: A policy author could write an IAM policy and not have to worry about all the other existing IAM policies. Additional properties such as an effect (allow or deny), a set of permissions (action or verb), and having some set of conditions by which a policy would be applied all seemed to match the direction we want to take with our system. Taking this as inspiration, we started looking for potential solutions that we could use to solve this, but nothing seemed to be able to accommodate what we needed. Open Policy Agent, Zanzibar, and Oso were some solutions we considered, but none really got to the core of what we were trying to solve. After thorough investigation, we started exploring our own solution.
In our first attempts at this, we developed a policy class that ended up looking something like this:
class DeletedFileACP < AccessControlPolicy
  # What type of resource does this policy apply to
  resource_type :file

  # If applied, should the specified permissions
  # be ALLOWED or DENIED (DENY overrides ALLOW).
  effect :deny

  # What actions are allowed/denied when this
  # policy is allowed or denied.
  permissions [ :can_edit, :can_view ]

  # What data do we need to load in order to
  # evaluate this policy. In this case, the
  # resource would be the file object.
  # (we ended up getting rid of this idea!)
  attached_through :resource

  # Should this policy be applied or ignored
  # if applied, permissions would be allowed/denied.
  def apply?(resource: nil, **_)
    resource.deleted?
  end
end
It contained an effect, a set of permissions, a resource type, and an apply? method, which just executed Ruby code given a set of loaded resources. Additionally, attached_through allowed attaching of resources such as the user, roles, parent resources (project, team, org), or similar. This last concept proved unintuitive and limiting (you can only load one resource?) and one we felt we wanted to iterate on.
One question loomed over us: Could we represent all of Figma’s many existing permissions rules using this model of policies? There was only one way to find out! We got to work on dividing all the logic into policies. Ensuring that we had all the logic defined in these functions and that all our existing tests passed proved to be a big undertaking. After a few weeks of painstaking back and forth with CI and lots of iteration, we ended up with what we needed: a branch where all the permissions were expressed in policies and all tests passing in CI/CD. These were hundreds of tests written over many years, so we were fairly confident that what we had worked.
In many ways, this ended up being the biggest step to de-risk the project. Through this work we were able to learn all the little intricacies of the permissions rules that engineers had added over the years and the product reasoning behind them.
At this point, we had a working proof of concept in one language and a green branch, but we still had a few issues to solve:
- Policies were still complicated to write. The whole idea of “attaching” resources and having these complex relationships seemed way harder than just specifying the resources required by the policy.
- The fact that we were writing imperative Ruby functions also meant that we had very little control about what actually happened inside the
apply?method. We wanted a way for the policy to only execute boolean logic without any network calls (e.g. to load data) or side-effects. - We still didn’t have a good story about how we were going to make these policies work across platforms. We started experimenting with Abstract Syntax Tree (AST) parsing, but implementing this for even one language felt like an unreliable solution—along with a bad developer experience and many headaches.
Introducing the DSL: Improving developer ergonomics and introspection
After developing this initial proof of concept, we wanted to tackle the problem of cross-platform support. In order to do that, we decided to make all policies JSON serializable and hence easy to read in both Sinatra and LiveGraph. Additionally, policies would be fully abstract and contain no code execution. No need for AST parsing.
We started by extending an existing DSL called ExpressionDef (or “Expression Definitions”) used by the LiveGraph team. This boolean logic DSL was based on triples containing two variables at either side and an operation in the middle, which would evaluate to a boolean ([1, “=”, 1] would equal true and [2, “>”, 3] would equal false). With these triples as a basis, you could then construct more complex pieces of boolean logic with three higher level operations: and, or, and not. With these you could express things like: { “and”: [[1, “=”, 1], [1701439764, “>”, 1701439775]] } or { “or”: [[1, “=”, 1], [1701439764, “>”, 1701439775]] } (which would evaluate to true and false respectively).
The second part of this JSON serializable DSL was the ability to reference the data provided to it. For this we made two small modifications: First, the left side of the triple would always be a reference to a data field and, second, you could always reference a data field on the right side by using a special ref object. Data fields would be represented through a string with the table name and column name separated by a “.”. You could write statements like these:
["team.permission", "=", "open"]["file.deleted_at", "<>", null]["file.team_id", "=", { "ref": "user.blocked_team_id" }]
You might notice here that we use generic terms like “team”, “file”, and “user” to refer to fields. This is actually the exact nomenclature we use in our policies. It’s up to the engine to handle these strings, but we love the simplicity of this model.
Expression Definitions opened a lot of doors for us, because now we can:
- Easily consume policies and their logic in any language or environment we want. No AST parsing required.
- Statically know all of the data dependencies we needed through very simple parsing.
- Provide a simple, straightforward API for policy authors where they could reference all the data they needed directly.
We opted to use TypeScript as the language in which these policies were written because of how widely it was already used at Figma, its type system, and how easy it was to serialize objects to JSON. Additionally, the original ExpressionDefs we based our work on were also written in TypeScript, which would make it easier to integrate with LiveGraph and other existing systems. Using TypeScript, we added types and variables to make writing these policies easier. We added types to everything, variables for all available fields, and convenience functions for some of the most common operations. In the end, policies ended up looking something like this:
class DenyEditsForRestrictedTeamUser extends DenyFilePermissionsPolicy {
  description = 'This user has a viewer-restricted seat in a Pro plan, so will not be able to edit the file.'

  applyFilter: ExpressionDef = {
    and: [
      not(isOrgFile(File)),
      teamUserHasPaidStatusOnFile(File, TeamUser, '=', AccountType.RESTRICTED),
    ],
  }
  // This compiles down to
 applyFilter: ExpressionDef = {
    and: [
      not([file.orgId, '<>', null]),
      or([
        and(["file.editor_type", "=", "design"], ["team_user.design_paid_status", "=", "restricted"]),
        and(["file.editor_type", "=", "figjam"], ["team_user.figjam_paid_status", "=", "restricted"]),
      ])
    ],
  }

  permissions = [FilePermission.CAN_EDIT_CANVAS]
}
You’ll notice that most values are strongly typed using enums or const objects. No typos! Additionally, commonly used snippets of logic are written as functions that return ExpressionDefs, which allow for easy composability between many different policies. This also helps with maintaining consistency between policies. Finally, convenience functions such as and, not, or, and exists add syntax sugar to make the experience of writing these policies more elegant.
Backend implementation
To make this policy DSL work, we needed to go from logical definitions to actual implementation. Two things were top of mind. First, we needed a boolean logic evaluation engine. This was a small library that could take in a dictionary of dictionaries representing the required data and a JSON policy declaration and return whether the policy was true or false. We called this the ApplyEvaluator. The second component was a database loader. We needed a way to go from strings like “file.id” and “team.created_at” to loading the appropriate data to feed to the logic engine. We called this component, quite creatively, DatabaseLoader.
ApplyEvaluator: Boolean logic engine
Our boolean logic DSL can be expressed in TypeScript as follows:
- A
FieldName, which is a string to represent a table name and column name separated by a“.”(Ex:“file.name”,“user.email”). - A
Valueto represent the basic data types.
export type FieldName = string;
export type Value = string | boolean | number | Date | null;
Based on these, we had a BinaryExpressionDef which is a triple with a FieldName on the left, a string representing the desired operation on the center, and a Value or a reference to a field (ExpressionArgumentRef) on the right. ExpressionArgumentRef are just FieldNames wrapped in an object in order to distinguish between string literals and references to FieldNames.
export type BinaryExpressionDef = [
  FieldName,
  '='| '<>' | '>' | '<' | '>=' | '<=',
  Value | ExpressionArgumentRef,
]
const type ExpressionArgumentRef = { type: 'field'; ref: FieldName }
Finally, these BinaryExpressionDef could be combined using and and or operators. ExpressionDef is a union of these three types.
export type ExpressionDef =
  | BinaryExpressionDef
  | OrExpressionDef
  | AndExpressionDef

export type OrExpressionDef = {
  or: ExpressionDef[]
}

export type AndExpressionDef = {
  and: ExpressionDef[]
}
Now that we have an ExpressionDef we can then write a simple function to evaluate the logic in it, which would look something like this:
interface Dictionary<T> { [Key: string]: T; }

function evalExpressionDef(expr: ExpressionDef, data: Dictionary<Dictionary<Value>>) {
  // Recursively walk through ExpressionDefs
  if (expr.and) {
    return expr.and.every(subExpr => evalExpressionDef(subExpr, data)
  }
  if (expr.or) {
   return expr.or.some(subExpr => evalExpressionDef(subExpr, data)
  }

  // Evaluate BinaryExpressionDef
  const [leftKey, operation, rightKeyOrValue] = expr;
  // Find values in data using provided keys
  const leftValue : Value = getValueFromKey(leftKey, data);
  const rightValue : Value = getValueFromKey(rightKeyOrValue, data);
  // Evaluate expression
  switch operation {
   case '='
     return leftValue === rightValue
   // ...
  }
}
You can imagine how, given the fact that ExpressionDefs are JSON serializable, we can easily write one of these in any other language, which we did for TypeScript, Ruby, and eventually Go. While it might seem scary to maintain multiple implementations of these engines in multiple languages, the simplicity of ExpressionDefs allowed us to write these small libraries in multiple languages fairly quickly (two to three days for a senior engineer). Additionally, we were also able to use the exact same test suites on all implementations, ensuring consistency.
Data loading
One of the main advantages of ExpressionDefs is that, given any permission name, we could calculate all the data dependencies required for it. We could iterate over all policies with a certain permission, recursively walk through its ExpressionDef, and return a list of all the data fields referenced. This would output a dictionary of arrays with the name of the table as the key and the columns as the values of the array, which would look something like this:
{
"file": ["id", "name", "created_at", "deleted_at"],
"team": ["id", "permission", "created_at"],
"org": ["id", "public_link_permission"],
"user": ["id", "email"],
"team_role": ["id", "level"],
"org_user": ["id", "role"]
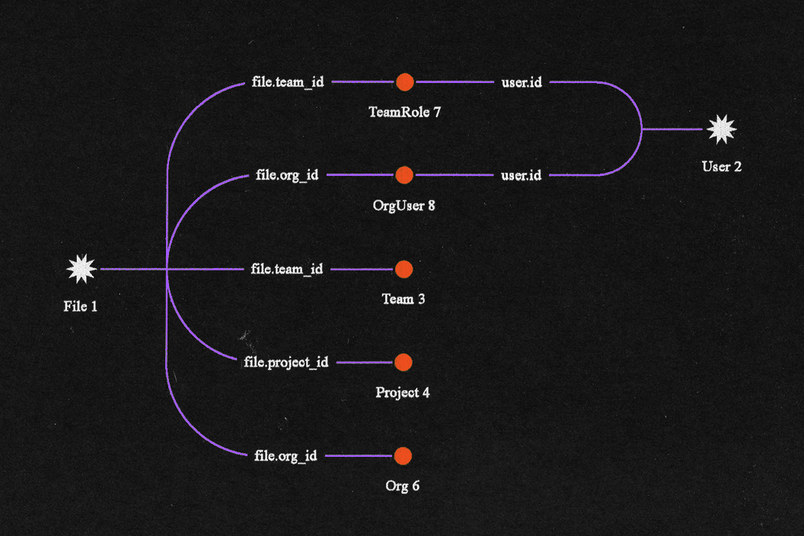
}From the above we know what table and columns to query, but we actually have no idea which rows to query. In order to understand how to query these, we need to go back to the API for our permissions function.
Our permission functions take in three arguments—a resource, a user, and a permission name:
file.has_permission?(user, CAN_EDIT)From the resource (in this case, a file) and user object, we can infer all the queries we need in order to load all required resources. We can imagine there being four groups of resources:
- Resources known at call time (
fileanduser). - Resources loaded through foreign keys in main resource object (through
file). - Resources loaded through columns in
userobject. - Resources loaded through columns in both the main resource and
userobjects.
{
  // Resources known when calling `has_permission?`
  "file": ["id", "name", "created_at", "deleted_at"],
  "user": ["id", "email"],

  // Resources loaded through `file` object
  "team": ["id", "permission", "created_at"], // file.team_id
  "org": ["id", "public_link_permission"],    // file.org_id

  // Resources loaded through combination of `file` and `user`
  "team_role": ["id", "level"],    // file.team_id + user.id
  "org_user": ["id", "role"]       // file.org     + user.id
}
With this idea in mind, we can use simple functions on our ActiveRecord models to define these IDs and allow ourselves to query any model:
class File
  def context_path
    {
      :project => self.project_id,
      :team    => self.team_id,
      :org     => self.org_id,
      :file    => self.file_id,
    }
  end
end

class User
  def context_path
    { :user => self.user_id }
  end
end

def get_context_path(resource, user)
  context_path = {}.merge(resource.context_path).merge(user.context_path)
  if context_path[:org] && context_path[:user]
    context_path[:org_user] = [context_path[:org], context_path[:user]]
  end
  if context_path[:team] && context_path[:user]
    context_path[:team_role] = [context_path[:team], context_path[:user]]
  end
  return context_path
end
Now our context_path object contains all the necessary IDs needed to load all data required to run any given permission check. When new loadable resources are added, we need to specify how their context path is going to be populated. And when a policy resource is added, we have to ensure we specify its context path.
The big advantage of this system is that, once we have established how to query a particular resource, engineers don’t have to worry about these relationships and how to query them. They can easily write policies that just reference “file”, “user”, “org”, and “team_role” and don't worry about which specific row they’re referencing.
The other advantage of this system is that we provide full control to the backend engine to decide how to load data: in which order, using which queries, using replicas or primary databases, using whichever interface to the database, using caching, etc. The policy author doesn’t have to worry or care about any of this.
With all these pieces together, we can imagine a basic algorithm that looks something like this:
function hasPermission(resource, user, permissionName) {
  // Find all relevant policies
  const policies = ALL_POLICIES
         .filter(p => p.permissions.include(permissionName))
  // Parse all resources required from policies
  const resourcesToLoad = policies.reduce((memo, p) => {
    const dataDependencies = parseDependences(p.applyFilter)
    return memo.merge(dataDependencies)
  }, {})

  // Load all necessary data
  const loadedResources = DatabaseLoader.load(resourceToLoad)

  // Bisect policies into DENY and ALLOW policies
  const [denyPolicies, allowPolicies] = policies
                      .bisect(p => p.effect === DENY)

  // Return false if any of the DENY policies evaluate to true
  const shouldDeny = denyPolicies.any(p => {
    return ApplyEvaluator.evaluate(loadedResources, p.applyFilter)
  })
  if (shouldDeny) { return false }

  // Return true if any of the ALLOW policies evaluate to true
  return allowPolicies.any(p => {
     return ApplyEvaluator.evaluate(loadedResources, p.applyFilter)
  })
}
The policy definition DSL, ApplyEvaluator, and DatabaseLoader became the main building blocks for the entire system. From these building blocks, we were able to iterate on the system in order to improve the performance of the system. Examples of this are simple things like not re-evaluating policies that had already been evaluated to false and using data that was already in memory (passed into the function).
DSL: Further consequences
After having the initial implementation working and having the system up and running, we continued iterating in order to improve performance, respond to user feedback, and make the system safer. From this we found three really interesting features that were made possible because of the nature of the DSL and the system we had built.
Debugging
Using our Sinatra database loader and our TypeScript ApplyEvaluator and policies, we built a front-end debugger. Figma employees across engineering and support could input a user ID and resource ID, and we’d load all the data we needed in the backend. Then, through an HTTP route, we’d load that data into the frontend and we integrated our ApplyEvaluator into React, through a recursive component. Because we already had a TypeScript implementation—and the data loading and logical evaluation was fairly separate—it ended up being straightforward. Plus, it allowed us complete freedom to present all sorts of debugging information. Users could expand and contract and and or permissions rules, read the data evaluated, show whether the rule evaluated to true or false, and through this find exactly the line in the policy that was (or seemed) incorrect.
We also extended this principle to the command line, where users could enable debugging on a particular policy, pass an environment variable when running their tests, and get a detailed breakdown of how that policy was evaluated.
[DenyEditsForNonPaidOrgUser] Filter passed to should_apply:
    [AND] true:
      - ["file.parent_org_id"]: 5281 <> null : true
        [NOT] true:
          [AND] false:
            - ["file.parent_org_id"]: 5281 <> null : true
            - ["file.team_id"]: 6697 = null : false
            - ["file.folder_id"]: 21654 <> null : true
            - ["org_user.drafts_folder_id"]: 21652 = { "ref": "file.folder_id"} : false
        [OR] true:
            [OR] true:
                [AND] true:
                  - ["file.editor_type"]: "design" = "design" : true
                  - ["org_user.account_type"]: "restricted" = "restricted" : true
Once again, the DSL we had here provided us with all the flexibility we needed to build this kind of tooling fairly easily.
Performance: Lazy loading, short circuiting
Once we had an initial version of the platform working, we invested some time trying to optimize and improve performance for our implementation. We knew that certain permissions could actually load more than a dozen different tables. This was not because all this data was required, but because there were many possible ways in which a user could gain access to a resource (multiple allow policies). In our system, while all deny policies must evaluate to false, we only need one allow policy to evaluate to true in order for the user to be granted permission.
Because of this, we wanted to only load part of the required data and evaluate the policies with that information. If we had a definitive true or false evaluation, we could exit early, without requiring any additional trips to the database. If we could not definitively evaluate the policy as true or false, we would continue loading data from the database, until we had a definitive answer. To make this optimization, we needed one new feature from our ApplyEvaluator: We needed the ApplyEvaluator to tell us when a piece of policy could not be definitively evaluated.
For example, if we take the following ExpressionDef, we can see that if we have the following data below and the following ExpressionDef, we don’t actually need to continue evaluating policies, since we know that logically this expression will always evaluate to true.
{ // Data
  "team": {
    "permission": "secret"
  },
  "file": PENDING_LOAD,  // We have not attempted to load this row!
  "project": PENDING_LOAD,
}

{ // ExpressionDef
  "and": [ // false
    ["file.id", "<>", null], // ?
    ["team.permission", "=", "open"], // false
    ["project.deleted_at", "<>", null], // ?
  ]
}
If, given the same data, we change the parent statement to an “or”, we now need to know the “file.id” and “project.deleted_at” in order to be able to say that this policy actually evaluates to true or false.
{
  "or": [
    ["file.id", "<>", null],
    ["team.permission", "=", "open"], // false
    ["project.deleted_at", "<>", null],
  ]
}
This is really a third indeterminate state that’s completely different from true and false. We represented this indeterminate state with null, meaning that we couldn’t conclusively evaluate the policy.
We used this new state to optimize our database loading. When we gathered all the data requirements for our policies, we would then partition all of the table dependencies into a discrete set of load steps to be loaded sequentially. We mostly decided how to divide this list using heuristics about what tables we know most often lead to evaluated permission decisions. File, folder, and team roles are the second most common way (after link access) by which users gain access to resources; we prioritized these in our load plan. Once we had generated this array, we iterated over it in order to load all those resources and feed them to the ApplyEvaluator. If the ApplyEvaluator returned true or false, that meant we could short circuit execution and return a result. If it returned null, we then loaded the next batch of resources we needed. This fairly simple optimization more than halved the total execution time of our permissions evaluation time and allowed us to minimize database utilization.
Static analysis
Finally, one of the other big advantages of going with a DSL was the ease of doing static analysis on our policies. At different moments in the development of new features, we saw multiple bugs related to logical issues found in policies. The most obvious issue we found was BinaryExpressionDefs with a = operation in the center and a field reference on the right side of the ExpressionDef where both values were evaluated to null.
{
  "file": { "team_id": null },
  "team": { "id": null }
}["file.id", "=", { "ref": "team.id" }]This condition would actually evaluate to true, but arguably it probably wasn’t what the policy author intended to express.
What the policy author should have done instead is ensure that one of those fields was not null. That can easily be done, by a sibling check under an and:
{
  "and": {
    ["team.id", "<>", null],
    ["file.id", "=", { "ref": "team.id" }]
  }
}
Based on this, we introduced a linter into our unit tests that would iterate over all policy ExpressionDefs and would throw an error if any right side field reference with a = operation didn’t have an accompanying sibling <> null check under an “and” ExpressionDef. Basically, we disallowed comparing two field names if you haven’t ensured that one of those references is not null. We also implemented similar rules related to similar operations, such as <> checks.
Because our DSL is JSON serializable, writing this linter didn’t involve any specialized AST parsing or similar. Instead, we had some simple TypeScript to recursively iterate through the ExpressionDefs. After adding this linter check to our CI/CD pipeline, this linter was able to catch a few other bugs that might have surfaced in production.
At some point, we considered adding these types of checks to the engine itself, but opted for static analysis instead for two reasons. First, we could get away from implementing this just once, since this did not have to be cross platform and was only evaluated at build time. Second, because it was a build time check, engineers could uncover bugs faster and didn’t have to wait to hit these while testing or (worse!) in prod or staging. Finally, we understood that the approach of having multiple engines is only viable because the engine is so simple. We didn’t want to make changes to the engine unless we really had to.
Staying curious
If you told me when we started this project that we were going to end up designing and implementing our own bespoke authorization DSL, I wouldn’t have believed you. Maybe that’s my own bias kicking in—I typically favor “buy” over “build” (or even “install” over “build”)—but I sincerely thought that was not where the problem was going to take us. And yet, by focusing closely on the problem at hand and being open to different solutions, we ended up coming up with something novel that really, truly worked for Figma.
We all but eliminated incidents and bugs caused by drifts in the logic between our Ruby and LiveGraph codebase, and with the debugger, we gave the engineering and support teams the tools to unblock themselves when they didn’t expect or understand a permission check, along with the ability to understand and dig deep into these permissions rules. Developing our own DSL allowed us to approach the problem at a very fundamental level and afforded us complete flexibility, which continues to pay off today.
If this type of work interests you, check out our open roles—we’re hiring!
Illustrations by Chantal Jahchan.
Related articles