Applications of Foreground-Background separation with Semantic Segmentation
In our previous post, we learned what is semantic segmentation and how to use DeepLab v3 in PyTorch to get an RGB mask of the detected labels within an image.

Recall that semantic segmentation is a pixel-wise classification of the labels found in an image.
The above figure shows an example of semantic segmentation. Each label is mapped to its corresponding color. The class “person” for example has a pink color, and the class “dog” has a purple color.
While semantic segmentation is cool, let’s see how we can use this output in a few real-world applications.
In this post, we will use DeepLab v3 in torchvision for the following applications
- Remove the background
- Change the background
- Blur the background
- Create an image filter by desaturating the background.
If you haven’t read our previous post on Semantic Segmentation using torchvision, I would recommend that you do so because we will modify some of the methods used in that post and skip over the details covered in the previous post
Download Code To easily follow along this tutorial, please download code by clicking on the button below. It's FREE!
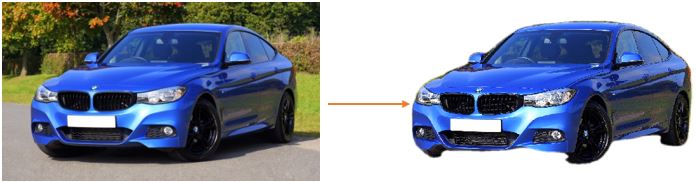
Remove the Background
Let’s pick a real-world application for demonstration.
Let’s say you own a website that sells used cars online (lucky you!).
The sellers on your website uploads pictures of their used cars. Needless to say, most sellers are not sophisticated photographers and so you cannot expect them to take pictures with nice backgrounds. You may also want consistency in your display so all pictures have the same solid colored background.
In this example, we will see how to remove the background on a picture of a car and achieve the result shown in the image on the right-hand side below, in the following section we will use DeepLab V3 to do just that.
We first import OpenCV in our code, then we will modify the existing decode_segmap function from our previous post to have an additional parameter source and add code in the same function.
import cv2
def decode_segmap(image, source, nc=21):
This source parameter is a path to the input image which we’ll be working with this time instead of the RGB output like before. Let’s look at the code that we add in this function
# Load the foreground input image foreground = cv2.imread(source)
Change the color of foreground image to RGB
and resize image to match shape of R-band in RGB output map
foreground = cv2.cvtColor(foreground, cv2.COLOR_BGR2RGB) foreground = cv2.resize(foreground,(r.shape[1],r.shape[0]))
Create a background array to hold white pixels
with the same size as RGB output map
background = 255 * np.ones_like(rgb).astype(np.uint8)
Convert uint8 to float
foreground = foreground.astype(float) background = background.astype(float)
Create a binary mask of the RGB output map using the threshold value 0
th, alpha = cv2.threshold(np.array(rgb),0,255, cv2.THRESH_BINARY)
Apply a slight blur to the mask to soften edges
alpha = cv2.GaussianBlur(alpha, (7,7),0)
Normalize the alpha mask to keep intensity between 0 and 1
alpha = alpha.astype(float)/255
Multiply the foreground with the alpha matte
foreground = cv2.multiply(alpha, foreground)
Multiply the background with ( 1 - alpha )
background = cv2.multiply(1.0 - alpha, background)
Add the masked foreground and background
outImage = cv2.add(foreground, background)
Return a normalized output image for display
return outImage/255
Let’s break down what is going on in the code above.
Want to learn Deep Learning and Computer Vision in depth? OpenCV (in collaboration with LearnOpenCV) is offering 3 Computer Vision courses.
1. Read the image
In the first two lines we read the input image source and convert it to RGB format just to be sure that we are working with an image in this format, we then resize this image to match the shape of our r-channel in the RGB output map produced by DeepLab V3 and passed into the decode_map function call.
2. Create a white background image
Next, we create a white background. This is done by creating a Numpy array of ones with the same shape as the RGB output map given by DeepLab V3. Finally, it is scaled to 255 to represent white pixels
3. Binarize mask
Next, we convert both the foreground and background to float type from uint8.
Then we create a binary mask of the RGB output map by setting the threshold value to 0. The cv2.threshold function compares the source pixels against the threshold value. Remember, our background pixels have a value of 0 so anything above this value is considered a foreground which is essentially our car picture in the given input image.
The output of the threshold function is stored in the alpha variable which is the binary mask we’re interested in.
To understand how thresholding works in OpenCV including different forms of supported thresholding please read this blog post.
4. Blur alpha mask
However, because the mask is binary, the boundary is hard. If we apply this mask to the original image, the output will have unpleasant jagged edges.
Before we use this mask we need to blur it slightly so that the sharp edges of the foreground are softened. We do this using the GaussianBlur function in OpenCV with a kernel width and height of 7.
5. Alpha blending foreground with background
Next, we use alpha-blending to merge the foreground and background images.
For more details and examples of how to use alpha blending in OpenCV please read this post.
First, the alpha mask is normalized to have an intensity range between 0 and 1. In the next two lines we multiply foreground and background with the alpha and 1 – alpha respectively. Finally, in the following line, we perform the actual merging of the masked foreground and background before returning the normalized output to display
6. Display results
All the hard work is done, and we are ready to display the results. Let’s call this function
segment(dlab, './images/bgremoval/redcar.png', show_orig=False)

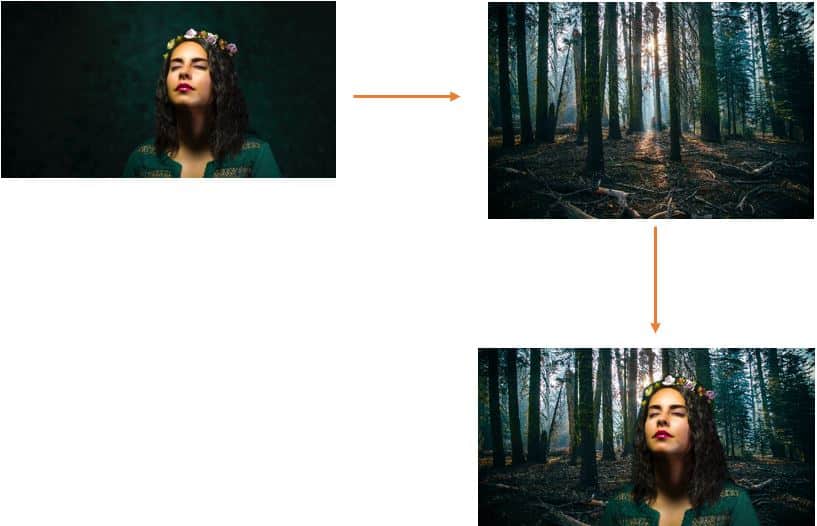
Change Background: Greenscreen matting without the green screen

Green Screen Example
Green screen matting or Chroma Keying is a well-established technique for adding an arbitrary background to an image.
The problem, of course, is that we need a green screen to achieve this effect.
In this section, we will learn how to do green screen matting without the green screen.
To do this we need a background image. So, we add a new parameter bgimg in the decode_segmap function
def decode_segmap(image, source, bgimg, nc=21):
Let’s look at the code below in the same decode_segmap function
# Load the foreground input image foreground = cv2.imread(source)
Load the background input image
background = cv2.imread(bgimg)
Change the color of foreground & background images to RGB
and resize images to match shape of R-band in RGB output map
foreground = cv2.cvtColor(foreground, cv2.COLOR_BGR2RGB) background = cv2.cvtColor(background, cv2.COLOR_BGR2RGB) foreground = cv2.resize(foreground,(r.shape[1],r.shape[0])) background = cv2.resize(background,(r.shape[1],r.shape[0]))
Convert uint8 to float
foreground = foreground.astype(float) background = background.astype(float)
Create a binary mask of the RGB output map using the threshold value 0
th, alpha = cv2.threshold(np.array(rgb),0,255, cv2.THRESH_BINARY)
Apply a slight blur to the mask to soften edges
alpha = cv2.GaussianBlur(alpha, (7,7),0)
Normalize the alpha mask to keep intensity between 0 and 1
alpha = alpha.astype(float)/255
Multiply the foreground with the alpha matte
foreground = cv2.multiply(alpha, foreground)
Multiply the background with ( 1 - alpha )
background = cv2.multiply(1.0 - alpha, background)
Add the masked foreground and background
outImage = cv2.add(foreground, background)
Return a normalized output image for display
return outImage/255
Much of the code looks similar to the code from the Remove Background section above, however note that instead of creating an array of values representing white background pixels like we did in the Remove Background section, we now have additional lines to load our background image background which is loading the image at the path bgimg supplied to the decode_map function in the parameter
We then convert this image to RGB format just like we did for the foreground image and resize it to match the shape of the r-band in the RGB output map similar to the foreground image.
Once we have loaded and resized this background image the remaining code doesn’t need to change at all as described in the Remove Background section above so instead of merging with the white pixels, we merge the masked foreground into the background image that we loaded in background
Here’s how we call this function with the additional image path
segment(dlab, './images/change/girl-with-hat.png','./images/change/background-building.png', show_orig=False)
segment(dlab, './images/change/girl.png','./images/change/forest.png', show_orig=False)

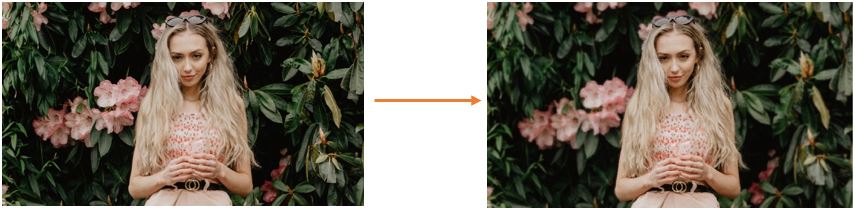
Blur Background
In high-quality portrait photography, it is common to use a lens with a large aperture to create a shallow depth of field such that the subject is in focus, and the background is out of focus.
Can we create the same effect by post-processing the image? Not exactly, but we can fake it to a very good approximation.
The exact background blurring effect would require us to have an accurate depth map of the scene because the amount of blur depends on the distance of the object from the plane of focus ( i.e. the person ).
But using a constant amount of blur is usually a good enough approximation and produces pretty pictures.
Let’s see how it is done.
# Load the foreground input image foreground = cv2.imread(source)
Change the color of foreground image to RGB
and resize image to match shape of R-band in RGB output map
foreground = cv2.cvtColor(foreground, cv2.COLOR_BGR2RGB) foreground = cv2.resize(foreground,(r.shape[1],r.shape[0]))
Create a Gaussian blur of kernel size 7 for the background image
blurredImage = cv2.GaussianBlur(foreground, (7,7), 0)
Convert uint8 to float
foreground = foreground.astype(float) blurredImage = blurredImage.astype(float)
Create a binary mask of the RGB output map using the threshold value 0
th, alpha = cv2.threshold(np.array(rgb),0,255, cv2.THRESH_BINARY)
Apply a slight blur to the mask to soften edges
alpha = cv2.GaussianBlur(alpha, (7,7),0)
Normalize the alpha mask to keep intensity between 0 and 1
alpha = alpha.astype(float)/255
Multiply the foreground with the alpha matte
foreground = cv2.multiply(alpha, foreground)
Multiply the background with ( 1 - alpha )
background = cv2.multiply(1.0 - alpha, blurredImage)
Add the masked foreground and background
outImage = cv2.add(foreground, background)
Return a normalized output image for display
return outImage/255
Most of the code looks similar to the Remove Background section but here we don’t create an array of white pixels. Instead, we apply a GaussianBlur of kernel width and height 7 to the foreground image and save the result in the blurredImage.
It is this image blurredImage that we will use to replace the background with to achieve the depth of field effect so the remainder of this code remains the same as in Remove Background section
Let’s call this code
segment(dlab, './images/blur/girl.png', show_orig=False)
segment(dlab, './images/blur/boy.png', show_orig=False)
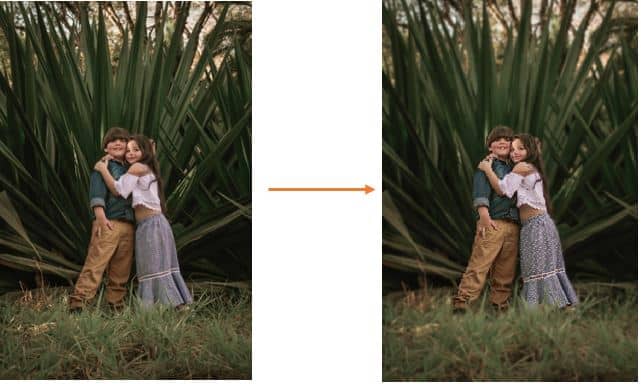
Desaturate or “Grayscale” background
You may have seen image filters where the object in focus is colored while the background is blurred.
Let’s see how we can build such a filter ourselves.
# Load the foreground input image foreground = cv2.imread(source)
Change the color of foreground image to RGB
and resize image to match shape of R-band in RGB output map
foreground = cv2.cvtColor(foreground, cv2.COLOR_BGR2RGB) foreground = cv2.resize(foreground,(r.shape[1],r.shape[0]))
Create a background image by copying foreground and converting into grayscale
background = cv2.cvtColor(foreground, cv2.COLOR_BGR2GRAY)
convert single channel grayscale image to 3-channel grayscale image
background = cv2.cvtColor(background, cv2.COLOR_GRAY2RGB)
Convert uint8 to float
foreground = foreground.astype(float) background = background.astype(float)
Create a binary mask of the RGB output map using the threshold value 0
th, alpha = cv2.threshold(np.array(rgb),0,255, cv2.THRESH_BINARY)
Apply a slight blur to the mask to soften edges
alpha = cv2.GaussianBlur(alpha, (7,7),0)
Normalize the alpha mask to keep intensity between 0 and 1
alpha = alpha.astype(float)/255
Multiply the foreground with the alpha matte
foreground = cv2.multiply(alpha, foreground)
Multiply the background with ( 1 - alpha )
background = cv2.multiply(1.0 - alpha, background)
Add the masked foreground and background
outImage = cv2.add(foreground, background)
Return a normalized output image for display
return outImage/255
If you have read this far, you can probably know the steps. We will use OpenCV to pick our background image and convert it to grayscale, we’re doing just that in first two lines in the above code and save the result in background variable
There is one problem though. The grayscale image has only one channel. Since we need to merge this image with the foreground which is in RGB format we need to convert it back to 3 channels RGB format.
We’re doing this using the cv2.cvtColor function and using the cv2.COLOR_GRAY2RGB parameter the result will keep the grayscale values but produce an image which has 3 channels required for the merge.
The rest of the code is similar to the sections above
When we call our script
segment(dlab, './images/greyscale/oldman.png', show_orig=False)
segment(dlab, './images/greyscale/boat.png', show_orig=False)

Subscribe & Download Code
If you liked this article and would like to download code (C++ and Python) and example images used in this post, please subscribe to our newsletter. You will also receive a free Computer Vision Resource Guide. In our newsletter, we share OpenCV tutorials and examples written in C++/Python, and Computer Vision and Machine Learning algorithms and news.