Setting up a Simple OCR Server
The following is a collaboration piece between Bobby Grayson, a software developer at Ahalogy, and Real Python.
OCR (Optical Character Recognition) has become a common Python tool. With the advent of libraries such as Tesseract and Ocrad, more and more developers are building libraries and bots that use OCR in novel, interesting ways. A trivial example is a basic OCR tool used to extract text from screenshots so you don’t have to re-type the text later on.
We’ll start by developing the Flask back-end layer to serve the results of the OCR engine. From there you can just hit the endpoint and serve the results to the end user in the manner that suits you. All of this is covered in detail by the tutorial. We’ll also add a bit of back-end code to generate an HTML form as well as the front-end code to consume the API. This will not be covered by the tutorial, but you will have access to the code.
Let’s get to it.
First, we have to install some dependencies. As always, configuring your environment is 90% of the fun.
This post has been tested on Ubuntu version 14.04 but it should work for 12.x and 13.x versions as well. If you’re running OSX, you can use VirtualBox, Docker (check out the Dockerfile along with an install guide are included) or a droplet on DigitalOcean (recommended!) to create the appropriate environment.

We need Tesseract and all of its dependencies, which includes Leptonica, as well as some other packages that power these two for sanity checks to start.
NOTE: You can also use the _run.sh shell script to quickly install the dependencies along with Leptonica and Tesseract. If you go this route, skip down to the Web-server time! section. But please consider manually building these libraries if you have not done so before (for learning purposes).
$ sudo apt-get update $ sudo apt-get install autoconf automake libtool $ sudo apt-get install libpng12-dev $ sudo apt-get install libjpeg62-dev $ sudo apt-get install g++ $ sudo apt-get install libtiff4-dev $ sudo apt-get install libopencv-dev libtesseract-dev $ sudo apt-get install git $ sudo apt-get install cmake $ sudo apt-get install build-essential $ sudo apt-get install libleptonica-dev $ sudo apt-get install liblog4cplus-dev $ sudo apt-get install libcurl3-dev $ sudo apt-get install python2.7-dev $ sudo apt-get install tk8.5 tcl8.5 tk8.5-dev tcl8.5-dev $ sudo apt-get build-dep python-imaging --fix-missing
Put simply, sudo apt-get update is short for “make sure we have the latest package listings”. We then grab a number of libraries that allow us to toy with images - i.e., libtiff, libpng, etc. Beyond that, we grab Python 2.7, our programming language of choice, along with the python-imaging library for interaction with all these pieces.
Speaking of images, we need ImageMagick as well if we want to toy with (edit) the images before we throw them in programmatically.
$ sudo apt-get install imagemagick
Again, if you ran the shell script, these are already installed, so proceed to the Web-server time! section
Now, time for Leptonica, finally!
$ wget http://www.leptonica.org/source/leptonica-1.70.tar.gz $ tar -zxvf leptonica-1.70.tar.gz $ cd leptonica-1.70/ $ ./autobuild $ ./configure $ make $ sudo make install $ sudo ldconfig
If this is your first time playing with tar, here’s what’s happening:
- Grab the binary for Leptonica (via
wget) - Unzip the tarball
cdinto the new unpacked directory- Run
autobuildandconfigurebash scripts to set up the application - Use
maketo build it - Install it with
makeafter the build - Create the necessary links with
ldconfig
Boom! Now we have Leptonica. On to Tesseract!
And now to download and build Tesseract…
$ cd .. $ wget https://tesseract-ocr.googlecode.com/files/tesseract-ocr-3.02.02.tar.gz $ tar -zxvf tesseract-ocr-3.02.02.tar.gz $ cd tesseract-ocr/ $ ./autogen.sh $ ./configure $ make $ sudo make install $ sudo ldconfig
The process here mirrors the Leptonica one almost perfectly. So to keep this DRY, see the Leptonica explanation for more information.

We need to set up an environment variable to source our Tesseract data:
$ export TESSDATA_PREFIX=/usr/local/share/
Finally, let’s get the Tesseract english language packages that are relevant:
$ cd .. $ wget https://tesseract-ocr.googlecode.com/files/tesseract-ocr-3.02.eng.tar.gz $ tar -xf tesseract-ocr-3.02.eng.tar.gz $ sudo cp -r tesseract-ocr/tessdata $TESSDATA_PREFIX
BOOM! We now have Tesseract. We can use the CLI to test. Feel free to read the docs if you want to play. However, we need a Python wrapper to truly achieve our end goal. So the next step is to set up a Flask server along with a basic API that accepts POST requests:
- Accept an image URL
- Run the character recognition on the image
Now, on to the fun stuff. First, we need to build a way to interface with Tesseract via Python. We COULD use popen but that just feels wrong/unPythonic. Instead, we can use a very minimal, but functional Python package wrapping Tesseract - pytesseract.
Want to get started quickly? Run the _app.sh shell script. Or you can set up the application manually by grabbing the boilerplate code/structure here and then running the following commands:
$ wget https://github.com/rhgraysonii/ocr_tutorial/archive/v0.tar.gz $ tar -xf v0.tar.gz $ mv ocr_tutorial-0/* ../home/ $ cd ../home $ sudo apt-get install python-virtualenv $ virtualenv env $ source env/bin/activate $ pip install -r requirements.txt
NOTE: The Flask Boilerplate (maintained by Real Python) is a wonderful library for getting a simple, Pythonic server running. We customized this for our base application. Check out the Flask Boilerplate repository for more info.
Now, we need to make a class using pytesseract to intake and read images. Create a new file called ocr.py in the “flask_server” directory and add the following code:
import pytesseract import requests from PIL import Image from PIL import ImageFilter from StringIO import StringIO def process_image(url): image = _get_image(url) image.filter(ImageFilter.SHARPEN) return pytesseract.image_to_string(image) def _get_image(url): return Image.open(StringIO(requests.get(url).content))
Wonderful!
So, in our main method, process_image(), we sharpen the image to crisp up the text.
Sweet! A working module to toy with.
Making a CLI is a great proof of concept, and a fun breather after doing so much configuration. So lets take a stab at making one. Create a new file within “flask_server” called cli.py and then add the following code:
import sys import requests import pytesseract from PIL import Image from StringIO import StringIO def get_image(url): return Image.open(StringIO(requests.get(url).content)) if __name__ == '__main__': """Tool to test the raw output of pytesseract with a given input URL""" sys.stdout.write(""" ===OOOO=====CCCCC===RRRRRR=====\n ==OO==OO===CC=======RR===RR====\n ==OO==OO===CC=======RR===RR====\n ==OO==OO===CC=======RRRRRR=====\n ==OO==OO===CC=======RR==RR=====\n ==OO==OO===CC=======RR== RR====\n ===OOOO=====CCCCC===RR====RR===\n\n """) sys.stdout.write("A simple OCR utility\n") url = raw_input("What is the url of the image you would like to analyze?\n") image = get_image(url) sys.stdout.write("The raw output from tesseract with no processing is:\n\n") sys.stdout.write("-----------------BEGIN-----------------\n") sys.stdout.write(pytesseract.image_to_string(image) + "\n") sys.stdout.write("------------------END------------------\n")
This is really quite simple. Line by line we look at the text output from our engine, and output it to STDOUT. Test it out (python flask_server/cli.py) with a few image urls, or play with your own ascii art for a good time.

Now that we have an engine, we need to get ourselves some output! Add the following route handler and view function to app.py:
@app.route('/v{}/ocr'.format(_VERSION), methods=["POST"]) def ocr(): try: url = request.json['image_url'] if 'jpg' in url: output = process_image(url) return jsonify({"output": output}) else: return jsonify({"error": "only .jpg files, please"}) except: return jsonify( {"error": "Did you mean to send: {'image_url': 'some_jpeg_url'}"} )
Make sure to update the imports:
import os import logging from logging import Formatter, FileHandler from flask import Flask, request, jsonify from ocr import process_image
Also, add the API version number:
_VERSION = 1 # API version
Now, as you can see, we just add in the JSON response of the Engine’s process_image() method, passing it in a file object using Image from PIL to install. And, yes - For the time being, this currently only works with .jpg images.
NOTE: You will not have
PILitself installed; this runs off ofPillowand allows us to do the same thing. This is because the PIL library was at one time forked, and turned intoPillow. The community has strong opinions on this matter. Consult Google for insight - and drama.
Run your app:
$ cd ../home/flask_server/ $ python app.py
Then in another terminal tab run:
$ curl -X POST http://localhost:5000/v1/ocr -d '{"image_url": "some_url"}' -H "Content-Type: application/json"
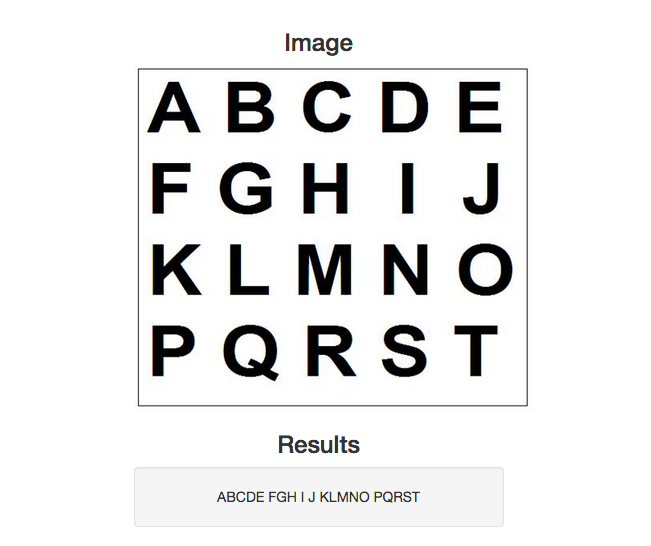
$ curl -X POST http://localhost:5000/v1/ocr -d '{"image_url": "https://realpython.com/images/blog_images/ocr/ocr.jpg"}' -H "Content-Type: application/json" { "output": "ABCDE\nFGH I J\nKLMNO\nPQRST" }
With the back-end API done along with the OCR Engine, we can now add a basic front-end to consume the API and add the results to the DOM via AJAX and jQuery. Again, this is not covered by this tutorial, but you can grab the code from the repository.
Test this out with some sample images:

Hope you enjoyed this tutorial. Grab the final code here from the repository. Oh—and please star the repo if you find this code/tutorial useful. Cheers!
Happy hacking!
Master Real-World Python Skills With Unlimited Access to Real Python

Join us and get access to hundreds of tutorials, hands-on video courses, and a community of expert Pythonistas:
Master Real-World Python Skills
With Unlimited Access to Real Python
Join us and get access to hundreds of tutorials, hands-on video courses, and a community of expert Pythonistas: