- Model merge extention for AUTOMATIC1111's stable-diffusion-webui
- Merge models can be loaded directly for generation without saving
This extension allows merged models to be loaded as models for image generation without saving them. This extension can prevent the use of HDD and SSD. This extension significantly improves the efficiency of model merging by eliminating the need for saving and loading the model and by generating continuously while changing ratios.
2024.02.02 0000(JST)
- bug fix
- MakeLoRaの標識が変わりました。Dreanboothに習ってモデル名をTunedとOriginalに変更しています。
- The model name for MakeLoRA has changed. Following to the Dreambooth, the model names have been changed to Tuned and Original.
2023.11.18.0000(JST)
- add new option:use cuda If you have enough GPU memory, merge speed will be 50x.
- 新しいオプション(use cuda)が追加されました GPUメモリに余裕がある場合マージスピードを50倍以上にできます。
2023.11.12
- change LoRA extract script: support SDXL,2.X
- support LoRA merge to checkpoint in SD2.X
- add new feature: Include/Exclude
- Bugfix
- Add new calcmode
extract(checkpoint/LoRA), Thanks subaqua!
In several modes, the functions used for calculations have been changed, resulting in faster merge computation speeds.
The calculation results should be the same, but if you cannot get the same result, please check the "use old calc method" in the options. The methods affected are as follows:
Weight Sum: normal, cosineA, cosineB
Sum Twice:normal
I am grateful to wkpark for proposing this method.
Attention! A minimum of 64GB of CPU memory is required for the XL model merge. Even with 64GB of memory, depending on the software you are using in conjunction, there is a risk of system instability. Therefore, please work in a state where it is acceptable for the system to crash. I encountered a blue screen for the first time in a while.
注意! XLモデルのマージには最低64GBのCPUメモリが必要です。64Gのメモリであっても併用しているソフトによってはシステムが不安定になる恐れがあるのでシステムが落ちてもいい状態で作業して下さい。私は久しぶりにブルースクリーンに遭遇しました。
If you have other extensions (like sd-webui-prompt-all-in-one) installed simultaneously, enabling the option to automatically open the browser upon launch can cause instability in its operation. It's likely an issue with Gradio, so it might be difficult to fix. Please disable that option and use it.
他の拡張機能(sd-webui-prompt-all-in-oneなど)を同時にインストールしている場合、起動時にブラウザを自動的に開くオプションを有効にすると、動作が不安定になることがあります。Gradioの問題である可能性が高いので、修正は難しいです。そのオプションを無効にしてお使いください。
All updates can be found here
The model merged here is loaded as a generation model for the Web-UI. The model display on the top left does not change, but the merged model is indeed loaded. The merged model will remain loaded until a different model is selected from the model selection on the top left.
Select models A/B/(C), the merge mode, and alpha (beta), then press Merge/Merge and Gen to start the merging process. In the case of Merge and Gen, generation is carried out using the prompt and other settings specified in txt2img.The Gen button only generates images, and the Stop button interrupts the merging process.
Read settings from merge log. The log is updated each time a merge is performed, and a sequential ID starting from 1 is assigned. "-1" corresponds to the settings from the last merge, and "-2" is for the one before last. The merge log is saved in extension/sd-webui-supermerger/mergehistory.csv. You can browse and search in the History tab. You can search and/or by separating with a half-width space.
If the model cache function of the Web-UI is enabled, SuperMerger will create a model cache to speed up continuous merging. During this process, the model is cached separately from the Web-UI's cache function. Please use this button to delete the cache after use. The cache is created in RAM, not VRAM.
Normal merge. Alpha is used. If MBW is enabled, MBW base is used as alpha.
Add difference, if MBW is enabled, MBW base is used as alpha
Merge 3 models at the same time. alpha and beta are used. I added this function because there were three model selection windows, but I am not sure if it works effectively.
Weight sum twice, alpha and beta are used.
You can set the calculation method. Please refer to here for details on each calculation method. Refer to the table below for the correspondence between the calculation method and Merge Mode.
| Calcmode | Description | Merge Mode |
|---|---|---|
| normal | Normal calculation method | ALL |
| cosineA | Calculate to minimize loss during merging, using ModelA as the reference. | Weight sum |
| cosineB | Calculate to minimize loss during merging, using ModelB as the reference. | Weight sum |
| trainDifference | 'Trains' that difference as if it was finetuning it relative to model A | Add difference |
| smoothAdd | Add difference that mixes the benefits of Median and Gaussian filters | Add difference |
| smoothAdd MT | Calculate using multi-threading to speed up. | Add difference |
| extract | Merge the common and uncommon parts between models B and C. | Add difference |
| tensor | Instead of sum, exchange the tensors themselves at a certain ratio. | Weight sum |
| tensor2 | When the tensor has a large number of dimensions, exchanges are performed based on the second dimension. | Weight sum |
| self | The weight is multiplied by alpha. | Weight sum |
Block-by-blockc merging is enabled. Please set the weights in the Merge Block Weight. Enabling this will disable alpha and beta.
| Options | Description |
|---|---|
| save model | Saves the model after merging. |
| overwrite | Enables overwriting of the model. |
| safetensors | Saves in safetensors format. |
| fp16 | Saves in half-precision. |
| save metadata | Saves merge information in metadata upon saving.(safetensors only) |
| prune | Removes unnecessary data from the model when saving. |
| Reset CLIP ids | Resets the CLIP ids. |
| use old calc method | Use old calculation method |
| debug | Outputs debug information to CMD. |
You can choose whether to save the Merge Id to the generated image or PNG info.
Currently, it is only effective when 'extract' is selected in calcmode.
You can set the model name. If not set, it will be determined automatically.
When saving the model, the selected VAE is incorporated into the model.
Saves the currently loaded model. This is effective when merging takes time due to PC specifications or other issues.
This is a merging technique where you can set the ratio block-by-block. Since each block may correspond to background depiction, characters, art style, etc., you can create a variety of merged models by changing the ratio for each block. The blocks vary depending on the version of SD, and there are blocks such as the following. BASE refers to the text encoder, which affects things like responses to prompts. IN-OUT refers to the U-Net, which is responsible for image generation.
Stable diffusion 1.X, 2.X
| 1 | 2 | 3 | 4 | 5 | 6 | 7 | 8 | 9 | 10 | 11 | 12 | 13 | 14 | 15 | 16 | 17 | 18 | 19 | 20 | 21 | 22 | 23 | 24 | 25 | 26 |
|---|---|---|---|---|---|---|---|---|---|---|---|---|---|---|---|---|---|---|---|---|---|---|---|---|---|
| BASE | IN00 | IN01 | IN02 | IN03 | IN04 | IN05 | IN06 | IN07 | IN08 | IN09 | IN10 | IN11 | MID | OUT00 | OUT01 | OUT02 | OUT03 | OUT04 | OUT05 | OUT06 | OUT07 | OUT08 | OUT09 | OUT10 | OUT11 |
Stable diffusion XL
| 1 | 2 | 3 | 4 | 5 | 6 | 7 | 8 | 9 | 10 | 11 | 12 | 13 | 14 | 15 | 16 | 17 | 18 | 19 | 20 |
|---|---|---|---|---|---|---|---|---|---|---|---|---|---|---|---|---|---|---|---|
| BASE | IN00 | IN01 | IN02 | IN03 | IN04 | IN05 | IN06 | IN07 | IN08 | MID | OUT00 | OUT01 | OUT02 | OUT03 | OUT04 | OUT05 | OUT06 | OUT07 | OUT08 |
Performs sequential merge image generation. Effective in all merge modes.
Change alpha and beta.
Change alpha and beta at the same time. Separate alpha and beta with a single space, and separate each element with a comma. If only one number is entered, the same value is entered for both alpha and beta.
Example: 0, 0.5 0.1, 0.3 0.4, 0.5
Performs a block-byblock merge. Enter ratios separated by newlines. Presets can be used, but be careful to separate on a new line.For Triple and Twice, enter two lines as a set. An odd number of lines will result in an error.
Changes the seed. Entering -1 will result in a fixed seed in the opposite axis direction.
Changes the model. The model selected in the model selection window is ignored.
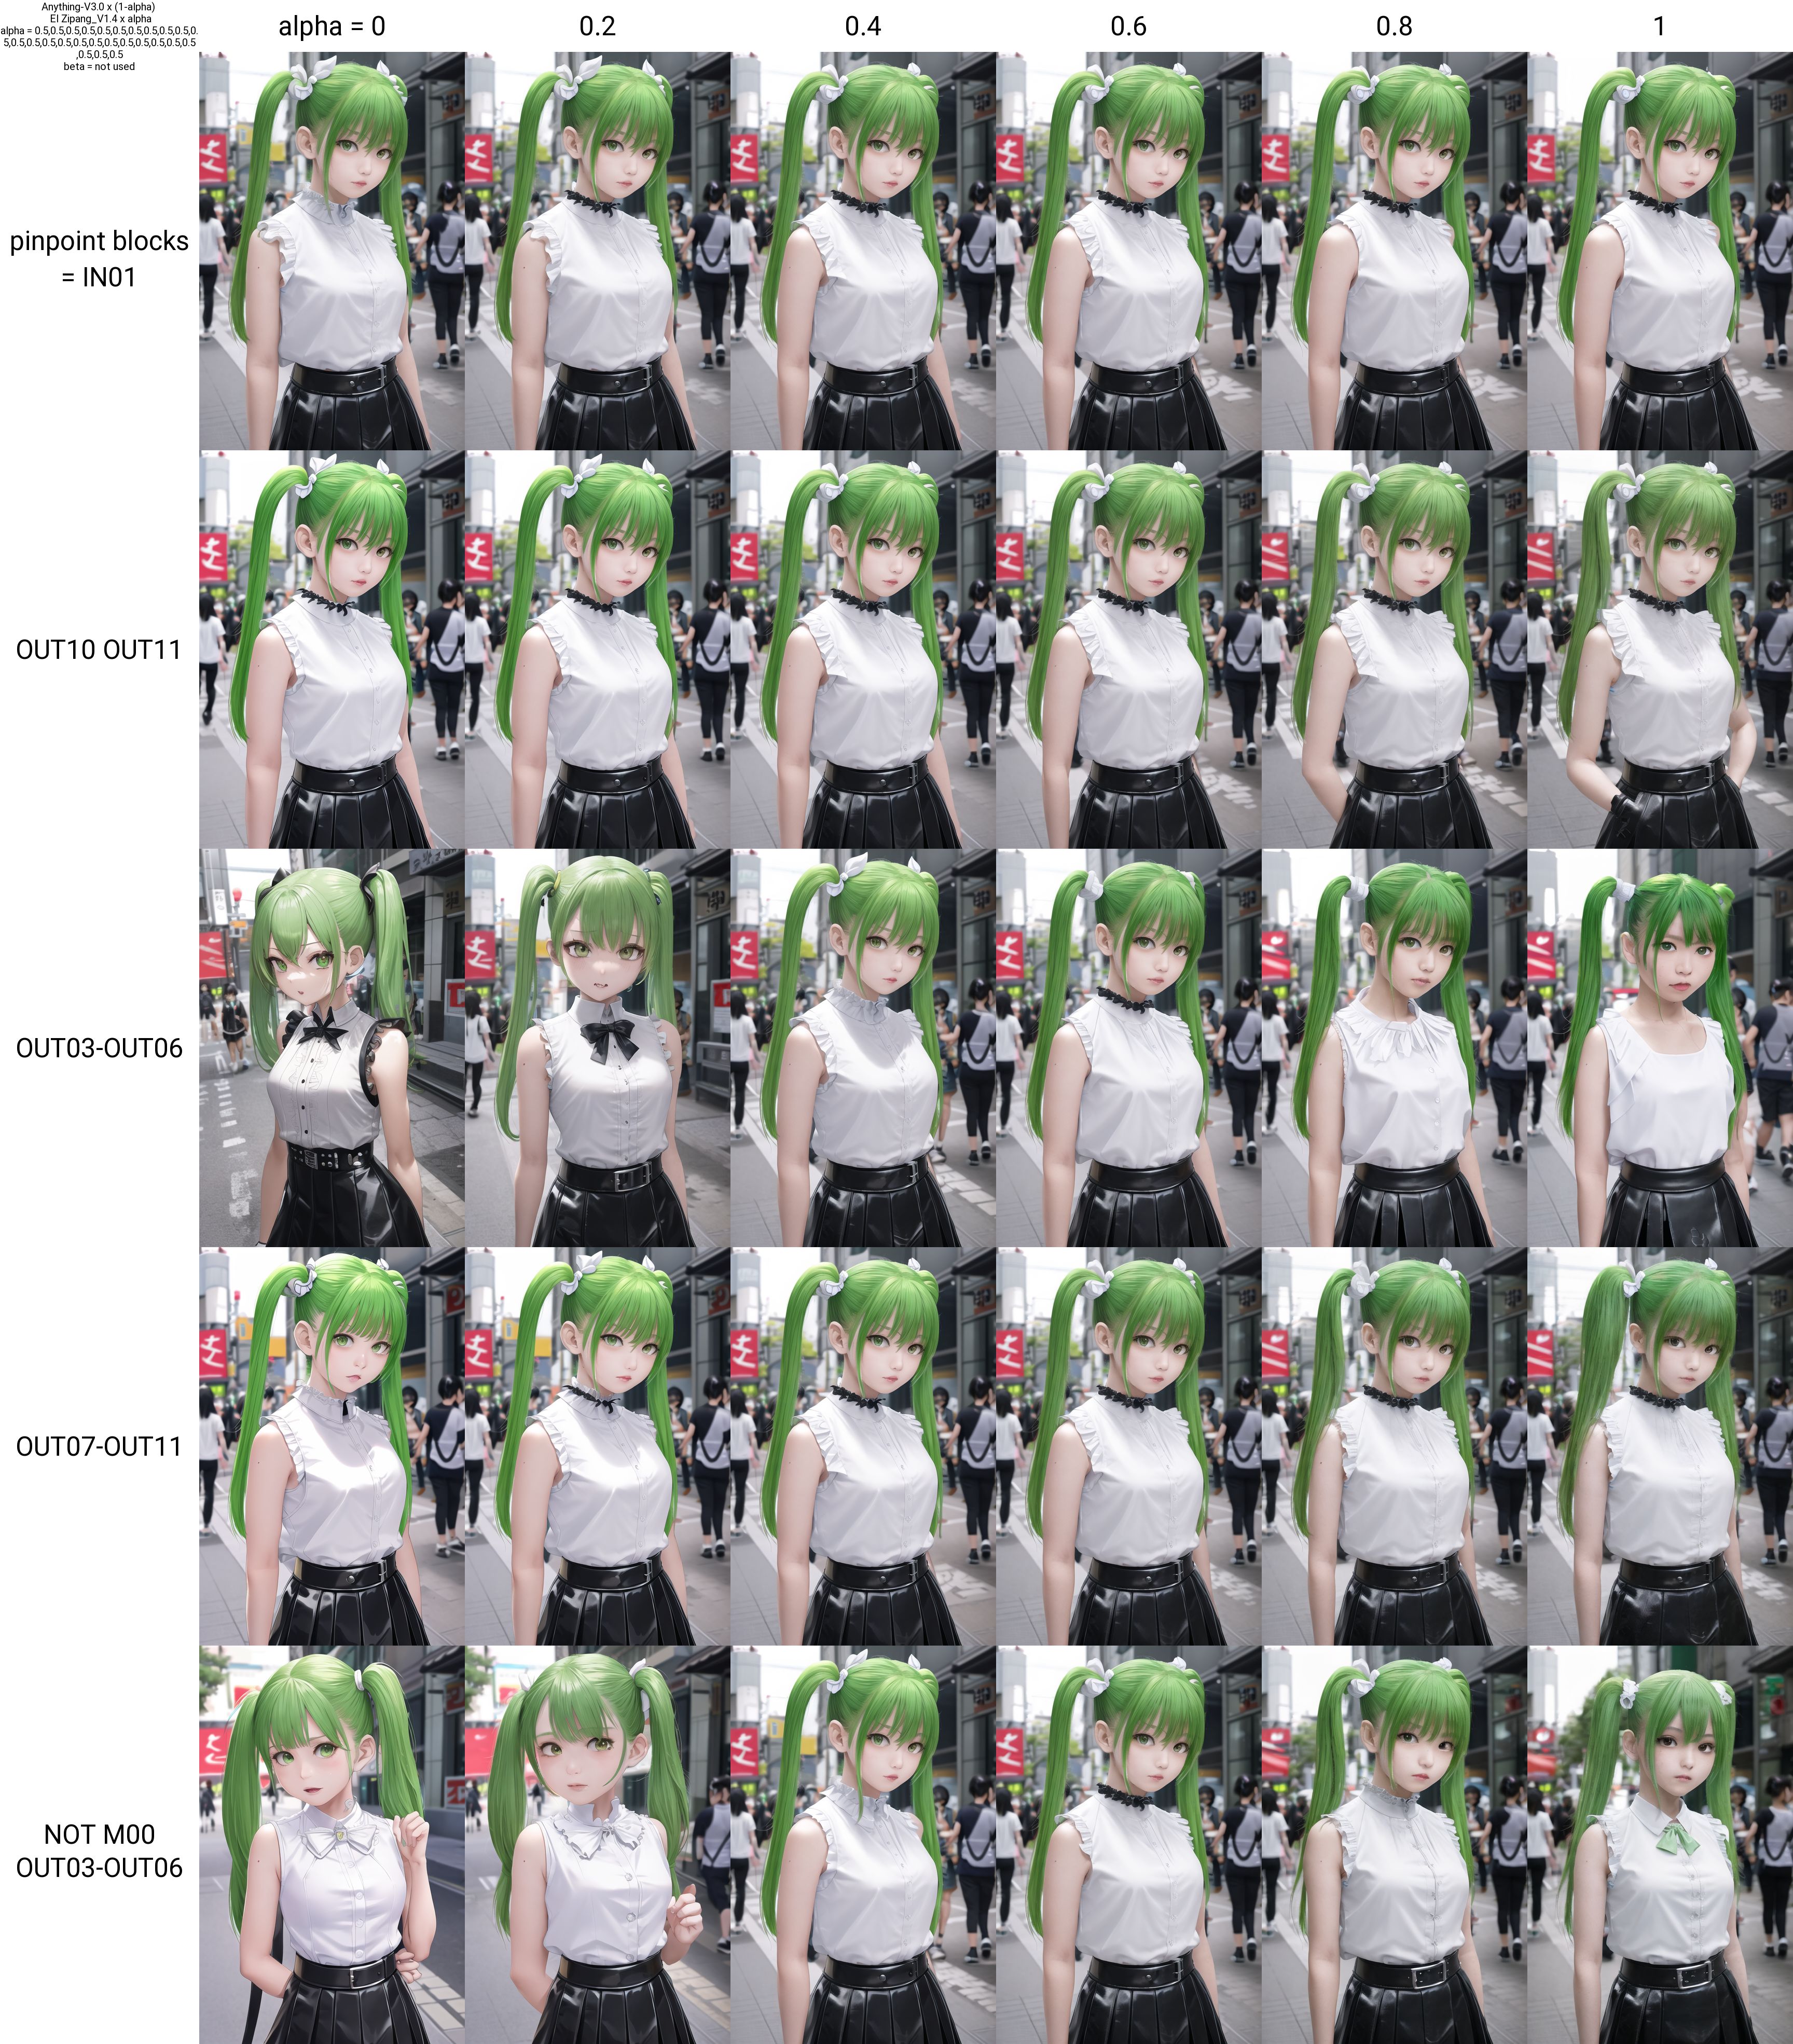
Changes only specific blocks in MBW. Choose alpha or beta for the opposite axis. If you enter a block ID, the alpha (beta) will change only for that block. As with the other types, use commas to separate them. Multiple blocks can be changed at the same time by separating them with a space or hyphen. NOT must be entered first to have any effect.
IN01, OUT10 OUT11, OUT03-OUT06, OUT07-OUT11, NOT M00 OUT03-OUT06
In this case:
- 1:Only IN01 changes
- 2:OUT10 and OUT11 change
- 3:OUT03 to OUT06 change
- 4:OUT07 to OUT11 change
- 5:All except for M00 and OUT03 to OUT06 are changed.
Please be careful not to forget to input "0".
Block ID (only upper case letters are valid) BASE,IN00,IN01,IN02,IN03,IN04,IN05,IN06,IN07,IN08,IN09,IN10,IN11,M00,OUT00,OUT01,OUT02,OUT03,OUT04,OUT05,OUT06,OUT07,OUT08,OUT09,OUT10,OUT11
for XL model BASE,IN00,IN01,IN02,IN03,IN04,IN05,IN06,IN07,IN08,M00,OUT00,OUT01,OUT02,OUT03,OUT04,OUT05,OUT06,OUT07,OUT08
change calclation mode.
Note the correspondence between calculation mode and merge mode.
You can change the prompt. The negative prompt does not change. Separate with a new line.
The Reserve XY plot button reserves the execution of an XY plot for the setting at the time the button is pressed, instead of immediately executing the plot. The reserved XY plot will be executed after the normal XY plot is completed or by pressing the Start XY plot button on the Reservation tab. Reservations can be made at any time during the execution or non-execution of an XY plot. The reservation list is not automatically updated, so use the Reload button. If an error occurs, the plot is discarded and the next reservation is executed. Images will not be displayed until all reservations are finished, but those that have been marked "Finished" have finished generating the grid and can be viewed in the Image Browser or other applications.
It is also possible to move to an appointment at any location by using "|".
Inputing "0.1,0.2,0.3,0.4,0.5|0.6,0.7,0.8,0.9,1.0"
0.1,0.2,0.3,0.4,0.5
0.6,0.7,0.8,0.9,1.0
The grid is divided into two reservations, "0.1,0.2,0.3,0.4,0.5" and "0.6,0.7,0.8,0.9,1.0" executed. This may be useful when there are too many elements and the grid becomes too large.
This corrects the amount of detail and color tone in your model. It employs a different mechanism from LoRA. By adjusting the input and output points of U-Net, the details and color tones of the image can be adjusted.
You can either enter directly into the textbox or decide the value with the slider and then reflect it in the textbox by pressing the up button. It will be ignored if left blank. Input seven numbers separated by commas.
0,0,0,0,0,0,0,0
This is the default, and effects appear as you shift these values.
The seven numbers correspond to
- Detail/Noise
- Detail/Noise
- Detail/Noise
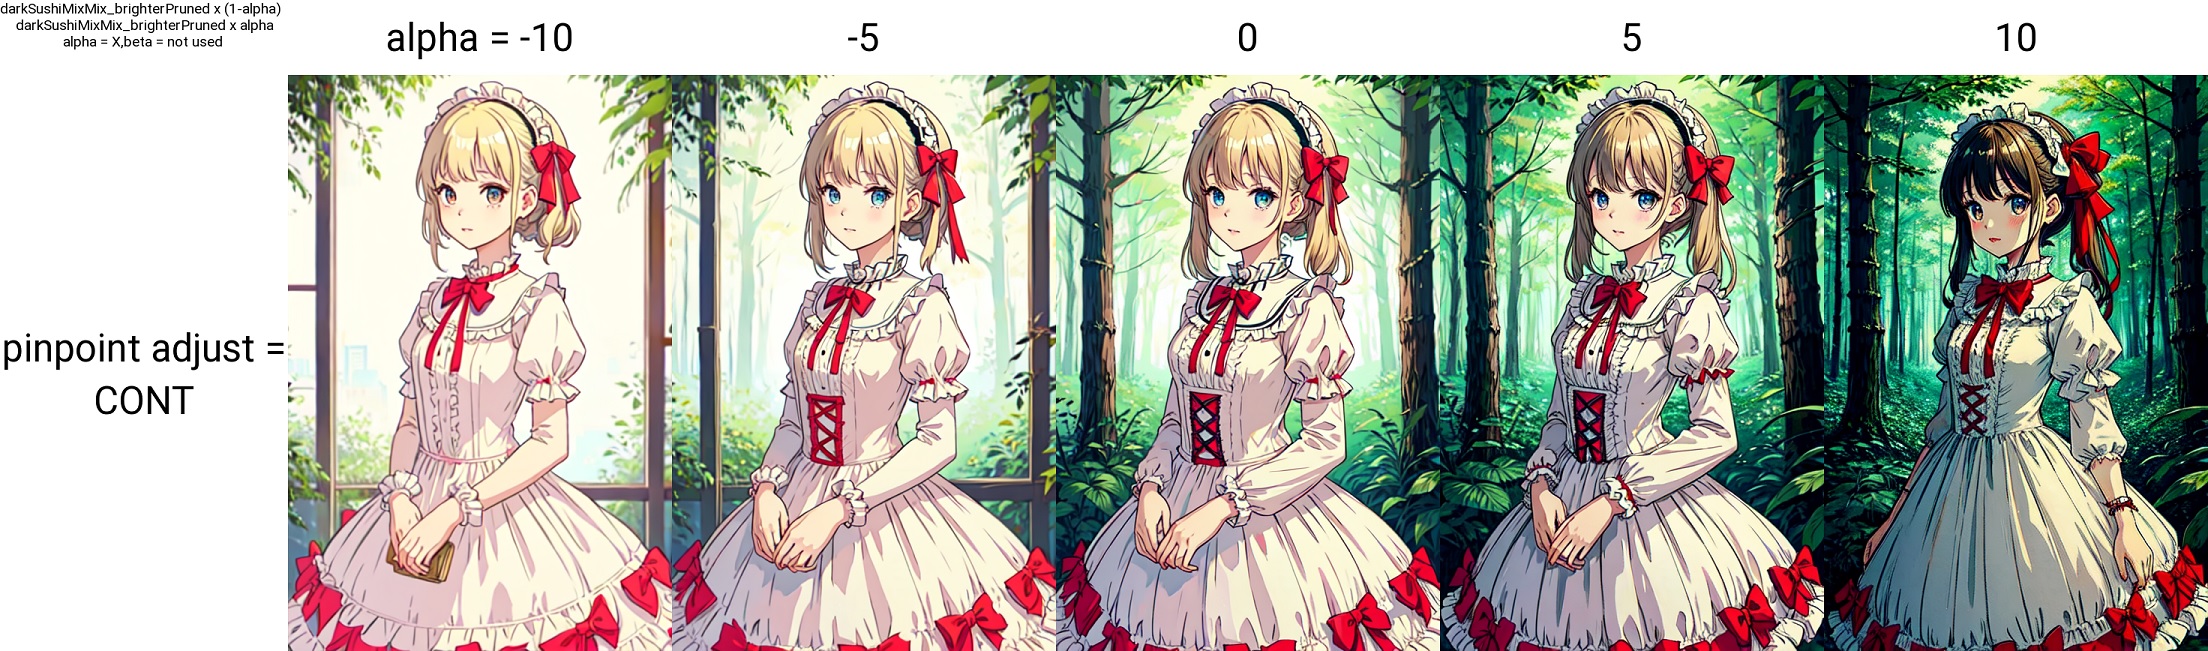
- Contrast/Detail
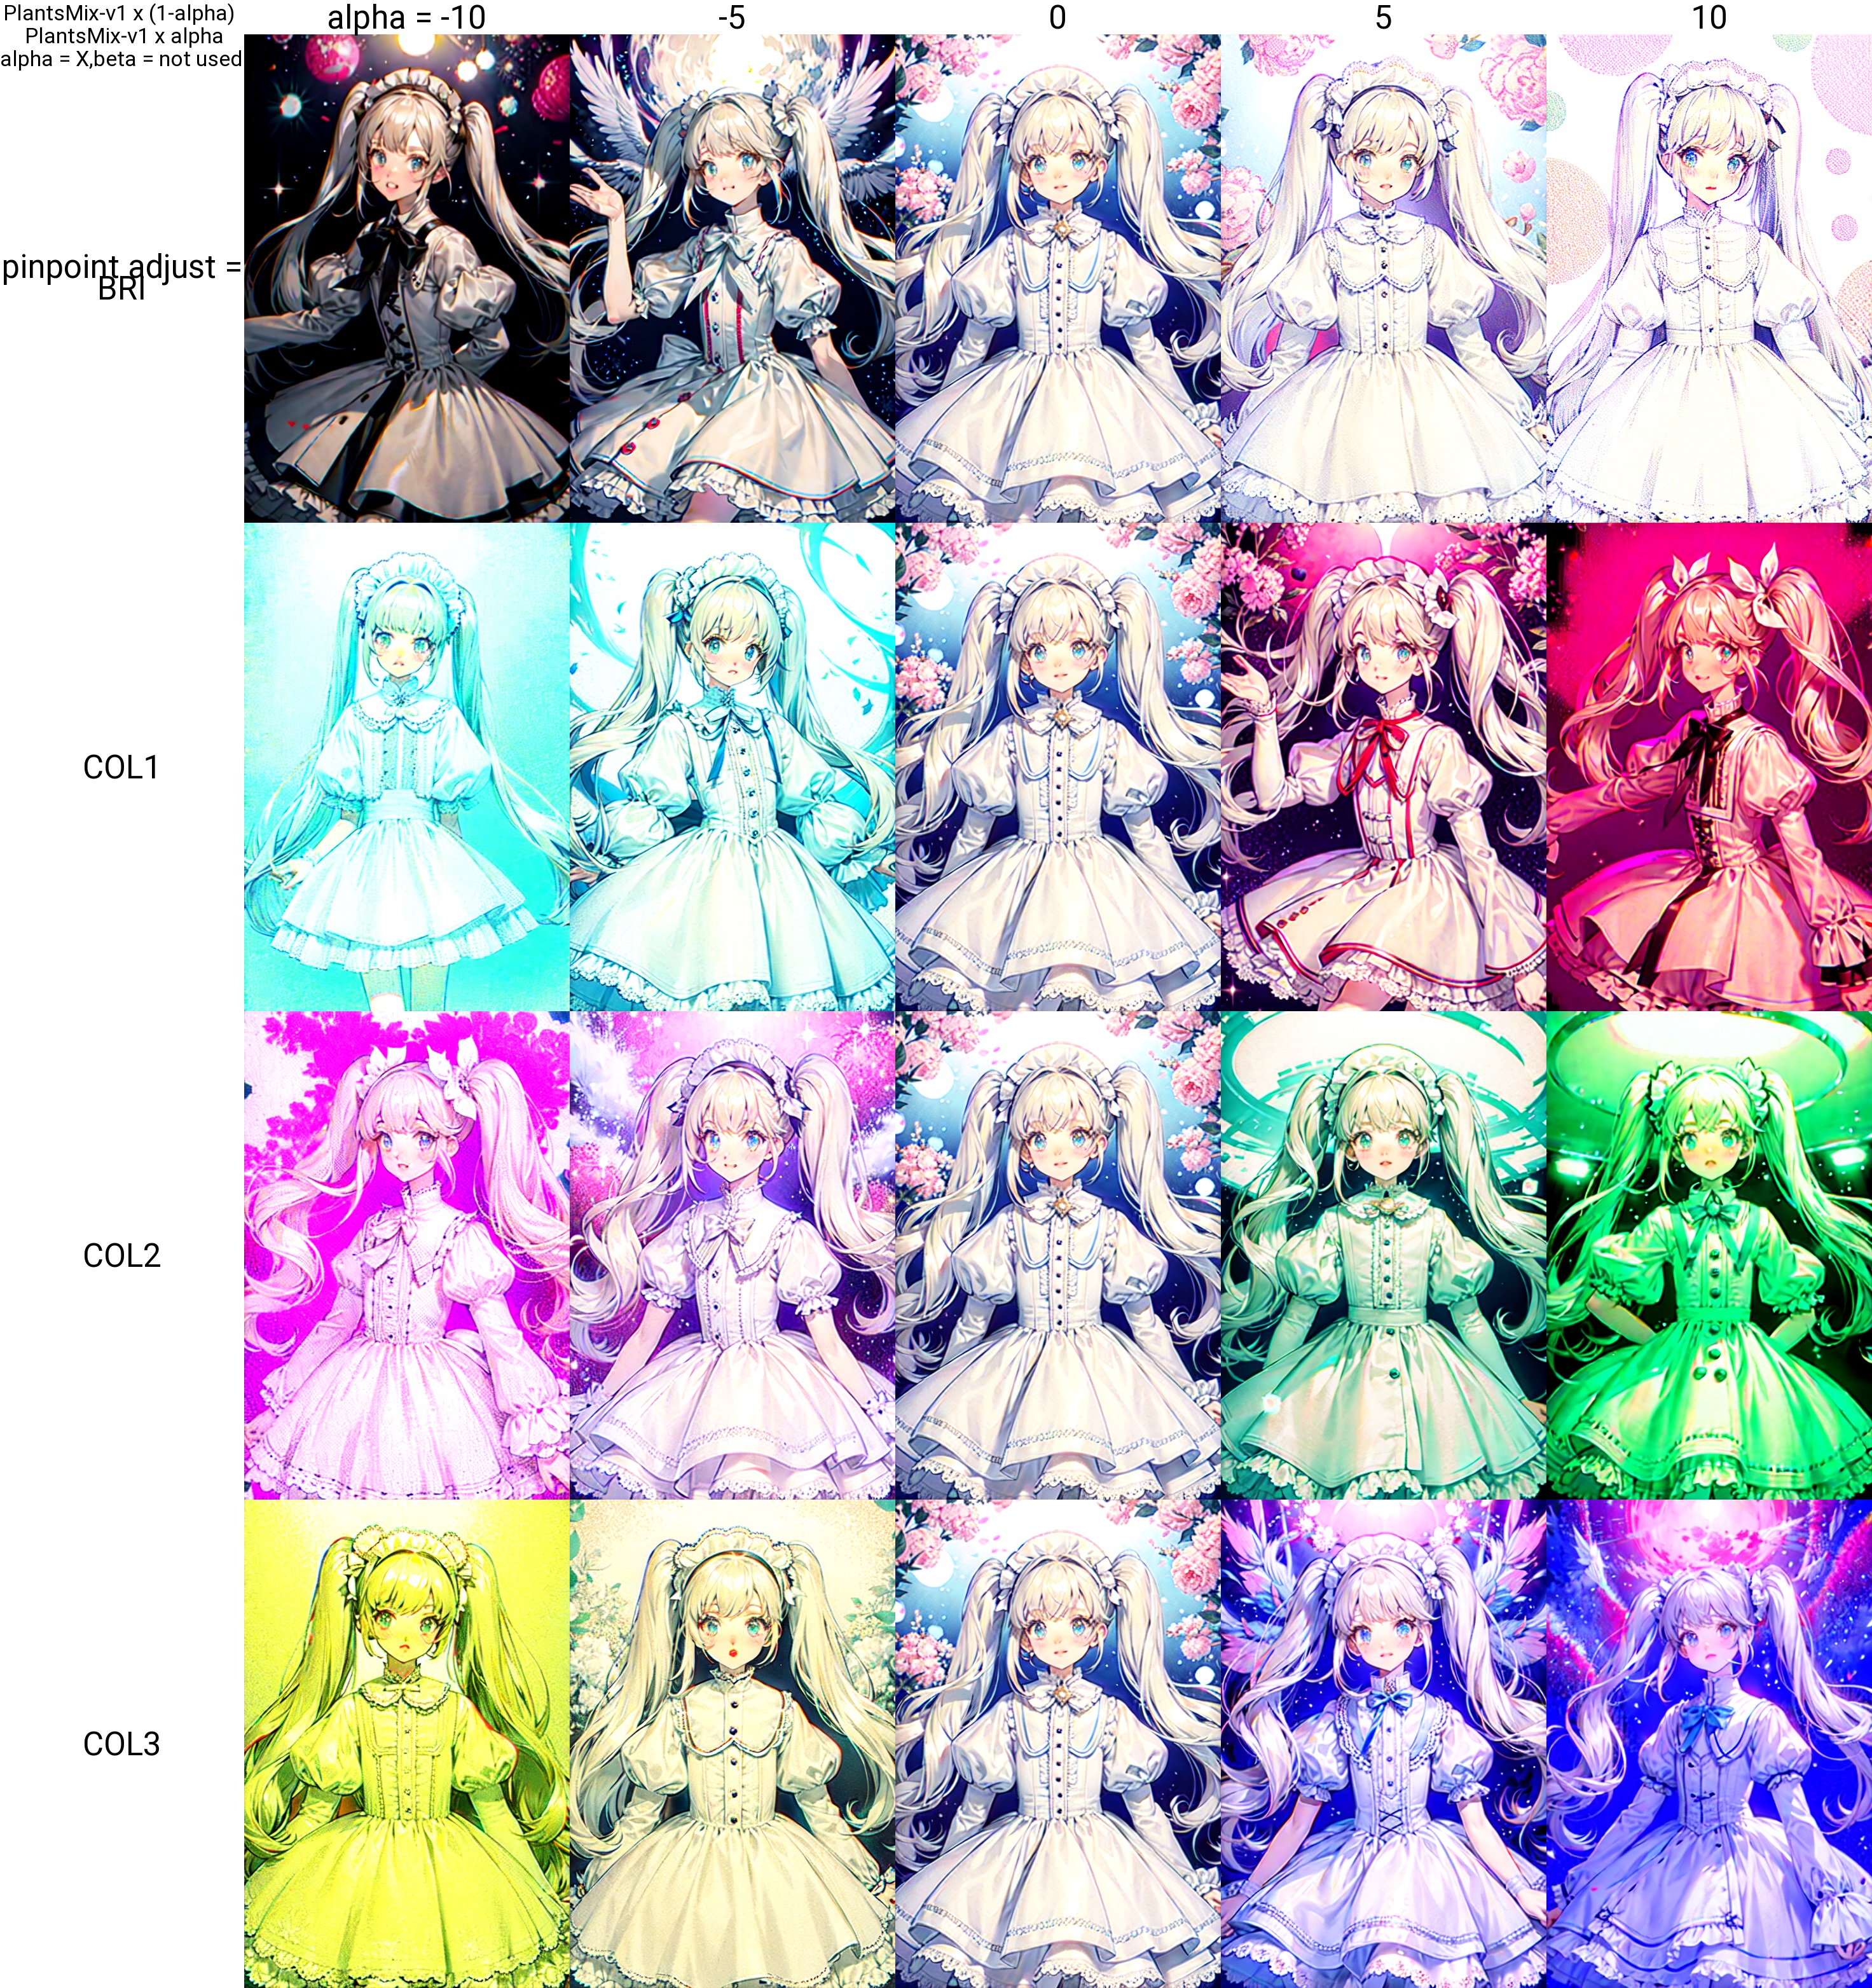
- Brightness
- Color Tone 1 (Cyan-Red)
- Color Tone 2 (Magenta-Green)
- Color Tone 3 (Yellow-Blue)
Please be aware that as the level of detail increases, so inevitably does the noise. Also, when using Hires.fix, the output may look different, so I recommend testing it with the expected settings. The values should be good up to about 5/-5, but it depends on the model. Entering a positive value will increase the level of detail. There are three types of color tones, which seem to correspond roughly to color balance.
1 corresponds to the input of the U-Net. Adjusting this allows you to control the level of detail in the image. The composition changes more easily here than in OUT. Making it negative will make it flatter and slightly blurred. Making it positive will increase the detail and make it noisier. Be aware that even if it's noisy in the regular generation, it may become cleaner with hires.fix. 2 and 3 correspond to the OUT part.

Adjusting this will change the contrast and brightness, as well as the level of detail. It's faster to see the sample.
You can correct the color tone. It seems to correspond roughly to the color balance.
Determines the merge ratio randomly.
Select the Random Mode and press Run Rand to generate images with randomly set weights for the number of challenges specified by Num of challenge. The generation operates in XYZ mode, so the STOP button is effective. At that time, please set Seed for Random Ratio to -1. Using the same seed ensures reproducibility. If the number of generations exceeds 10, the grid will automatically become two-dimensional. Checking the alpha and beta in Settings will randomize them. For Elemental, beta will be disabled.
Random weights are set for all 26 blocks. The difference between R, U, and X is the range of random values. For X, specify lower limit to upper limit for each layer.
R: 0 ~ 1
U: -0.5 ~ 1.5
X: lower limit ~ upper limit
Random weights are set for all Elementals. The difference between ER, EU, and EX is the range of random values. For X, specify lower limit to upper limit for each layer.
Specifies the hierarchical level to be randomized. Specify it as custom.
You can use R, U, X, ER, EU, and EX.
Example:
U,0,0,0,0,0,0,0,0,0,0,0,0,R,R,R,R,R,R,R,R,R,R,R,R,R
U,0,0,0,0,0,0,0,0,0,0,0,0,ER,0,0,0,0,0,0,X,0,0,0,0,0
roundsets the decimal places for rounding. With the initial value of 3, it becomes 0.123.save E-listsaves the key and ratio of Elemental in csv format toscript/data/.
You can use the XYZ Plot by setting the type to random. Enter the number of times you want to randomize, and the parameters will be set accordingly.
For example:
X type: seed, -1, -1, -1
Y type: random, 5
With this configuration, a 3x5 grid will be created, and the model will generate images using weights randomly set for 5 iterations. Please make sure to set the randomization option on the random panel. It will not function properly if it is set to off.
see here
You can also set the conditions for image generation here. If values are set here, they will take priority.
When merging, you can set blocks that you want to include/exclude. Only the selected blocks will be merged / will not be merged. If you check 'print', you can confirm whether a block has been include/excluded on the Command Prompt screen. If you check 'Adjust', the elements used in Adjust will be included/excluded. You can also specify things like attn, and in this case, elements containing attn will be included/excluded. Separate the strings with commas.
Deletes the currently loaded model. This is used to free up GPU memory when using kohya-ss GUI. Once the model is deleted, you will not be able to generate images. If you want to generate images, please re-select models.
LoRA related functions. It is basically the same as kohya-ss scripts, but it supports block-by-block merging.
Note: LyCORIS supports only single merge due to its special structure. Only ratios of 1,0 can be used for single merges. If any other value is used, the result will not match the Block weight LoRA result, even if the value is "SAME TO STRENGTH". LoCon will match reasonably well even with non-integers.
LoCon/LyCORIS merge to model is enable in web-ui 1.5
| 1.X,2.X | LoRA | LoCon | LyCORIS |
|---|---|---|---|
| Merge to Model | Yes | Yes | Yes |
| Merge LoRAs | Yes | Yes | No |
| Apply Block Weight(single) | Yes | Yes | Yes |
| Extract From Models | Yes | No | No |
| XL | LoRA | LoCon | LyCORIS |
|---|---|---|---|
| Merge to Model | Yes | Yes | Yes |
| Merge LoRAs | Yes | Yes | No |
| Extract From Models | Yes | No | No |
Merges one or more LoRAs. kohya-ss's latest script is used, so LoRAs with different dimensions can be merged, but note that the generated images may differ significantly because LoRAs are recalculated when dimensions are converted.
The calculate dimention button calculates the dimensions of each LoRA and activates the display and sorting functions. The calculation is rather time-consuming and takes several tens of seconds for a LoRA of about 50. Newly merged LoRAs will not appear in the list, so please press the reload button. Dimension recalculation only calculates the added LoRAs.
Merge LoRAs into a model. Multiple LoRAs can be merged at the same time.
Enter LoRA name1:ratio1:block1,LoRA name2:ratio2:block2,...
LoRA can also be used alone. The ":block" part can be omitted. The ratio can be any value, including negative values. There is no restriction that the total must sum to 1 (of course, if it greatly exceeds 1, it will break down).
To use ":block", use a block preset name from the bottom list of presets, or create your own. Ex:
LoRAname1:ratio1
LoRAname1:ratio1:ALL
LoRAname1:ratio1:1,0,0,0,1,1,1,1,1,1,1,1,0,0,0,0,0
Generates a LoRA from the difference of two models.
If you specify a demension, it will be created with the specified dimension. If no demension is specified, LoRAs are created with dim 128.
The blend ratio can be adjusted by alpha and beta.
see here
Create new minimal Metadata. Only dim, alpha, basemodel version, filename, and networktype will be generated.
Information of each LoRA is saved, and tags are merged. (The information of each LoRA is not visible with the simple Metadata reading function in the Web-UI)
Information of each LoRA is saved. (The information of each LoRA is not visible with the simple Metadata reading function in the Web-UI)
Copy the information of the first LoRA as is.
The prompt field is used to load the LoRA ratio settings. This includes the settings for LoRA Block Weight, allowing for direct merging.
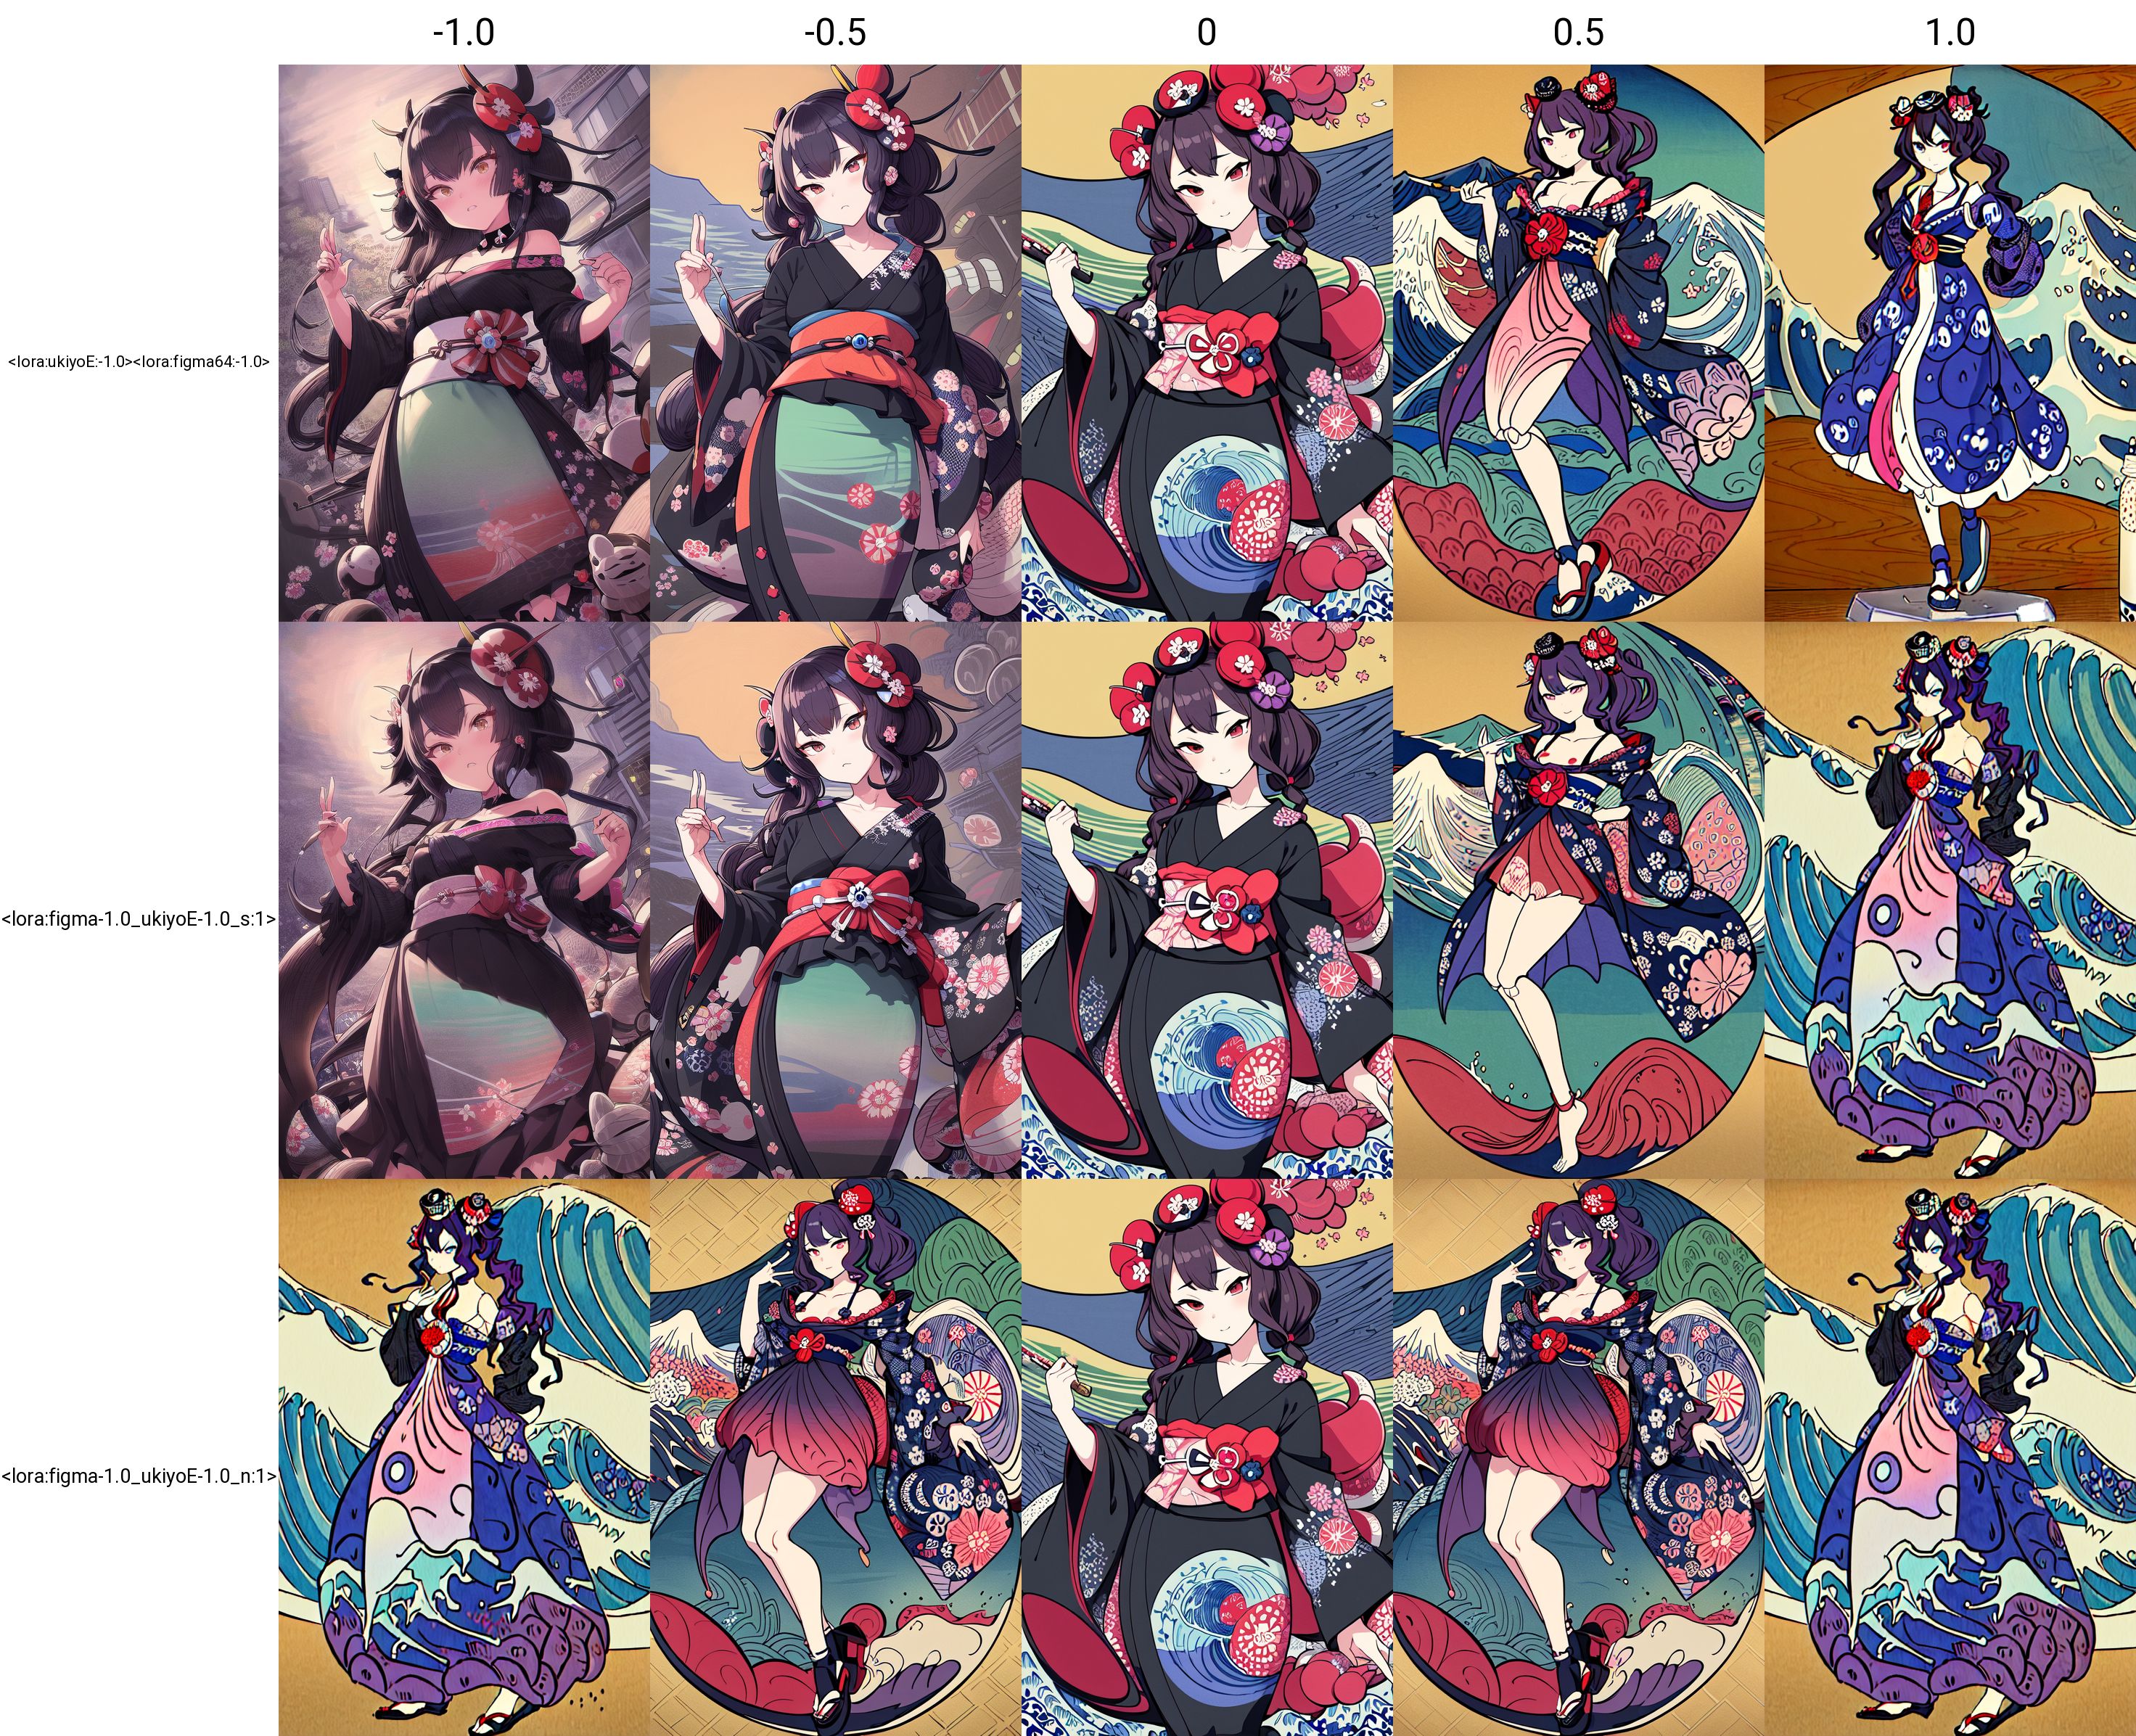
If the same to Strength option is not used, the result is the same as the merge in the script created by kohya-ss. In this case, the result is different from the case where LoRA is applied on Web-ui as shown in the figure below. The reason for this is related to the mathematical formula used to adopt LoRA into U-net. kohya-ss's script multiplies the ratio as it is, but the formula used to apply LoRA squares the ratio, so if the ratio is set to a number other than 1, or to a negative value, the result will differ from Strength (strength when applied). Using the SAME TO STRENGTH option, the square root of the ratio is driven at merge time, so that Strength and the ratio are calculated to have the same meaning at apply time. It is also calculated so that a negative value will have the same effect. If you are not doing additional learning, for example, you may be fine using the SAME TO STRENGTH option, but if you are doing additional learning on the merged LoRA, you may not want to use anyone else's option.
The following figures show the generated images for each case of normal image generation/same to Strength option/normal merge, using merged LoRAs of figmization and ukiyoE. You can see that in the case of normal merge, even in the negative direction, the image is squared and positive.
Analyze the differences between two models. Select the models you wish to compare, model A and model B.
The ASimilality mode compares tensors computed from qkv. Other modes calculates from the cosine similarity of each element. It seems that the calculated difference becomes smaller in modes other than ASimilality mode. Since the ASimilality mode gives a result that is closer to the difference in output images, you should generally use this one. This Asimilality analysis was created by extending the Asimilality script.
This is a method to calculate the ratio for each hierarchy in modes other than the ASimilality mode. Mean represents the average, min represents the minimum value, and attn2 outputs the value of attn2 as the calculation result of the block.
You can search the merge history. The search function allows for both 'and' and 'or' searches.
You can obtain a list of the Elements contained in the model, the assignment of blocks, and the size of the tensors.
This script uses several scripts by kohya and bbc-mc. I would also like to thank everyone who contributed to the development of the extensions.