SVG Text Tutorial: Text Annotation on the Web
Texts are an integral part of user interfaces. In many cases, text annotation plays a vital role in grabbing the user’s attention or allowing the user to decorate and highlight the content they produce.
In this article, we walk through the ins and outs of an open-source JavaScript library built for annotating texts on the web.

Anton is a software developer and technical consultant with 10+ years of experience in desktop-distributed applications.
Expertise
With HTML5 and CSS3, web browsers acquired a number of amazing technologies: 3D graphics, sockets, threads, and more. With these, web applications can tap into some of the most sophisticated capabilities of the computers and operating systems that they are used on. The web browser offers a robust versatile ecosystem for application development, which is evident from the recent rise of numerous powerful web applications that we cannot live without. However, something that is still missing is the beauty of HTML text annotation and decoration. What is text decoration? Squiggly underlines, rugged highlights, and wavy strikeouts are some of the things that web browsers do not provide native support of. This may sound more elaborate than useful, but the capability for JavaScript Developers to produce these styles may prove useful in aspects such as e-learning resources and web based ebook readers. Moreover, this can contribute to the enhancing of user experience in web applications that revolve around natural design principles. At the very least, building such a tool is fun and provides insight into the many quirks of a web browser.
Developers have found many workarounds to the web browser limitation. Many of these workarounds involve the use of CSS in less intuitive ways, as some use images in the “::after” pseudo elements. This works, but maintaining many images for each style-color pair often proves to be difficult. This article takes a look at the anatomy of a JavaScript library that tries to solve this problem elegantly.
The library is open source, and is available on GitHub: Text Annotator
Overview
While developing this library, special attention was given to ensuring compatibility with the most popular web browsers (including IE 9+). However, unlike how most solve this problem, the library doesn’t rely on specifically obscure CSS tricks; or worse, special Unicode symbols. Instead it uses SVG to achieve much better, cleaner text decorations.
Fundamentally, the library implements an Annotator “class” that can be used to automatically create DIV elements, position them under texts to be annotated, and fill their backgrounds with SVG images. Multiple DIVs can be combined to further customize the decorations. The approach is cross-browser compatible, provides flexibility over positioning of decorative elements, and allows easier extension with custom templates.
The library has been developed using Google Closure Tools because it is modular and cross-browser, which helps produce compact and fast JavaScript code without any additional dependency.
Architecture
The library has been designed as a collection of JavaScript “classes”, and exposes all the necessary functionalities to the user through the “class” Annotator:

Here is a brief outline of the available functionalities:
-
annotateDocument - annotates elements, which are marked with a “data-annotate” attribute.
-
underline - underlines element
-
highlight - highlights element
-
strike - strikes element
-
underlineSelected - underlines selected text
-
highlightSelected - highlights selected text
-
strikeSelected - strikes selected text
-
unannotateElement - removes annotation from element
-
getTemplates - returns dictionary of annotation templates
-
setUnderlineOptions - sets settings for underline annotator
-
setHighlightOptions - sets settings for highlight annotator
-
setStrikeOptions - sets settings for strike annotator
The annotator class holds three instances of AnnotatorImpl class for each annotating function: underline, highlight, and strike.
tvs.Annotator = function() {

    this.underliner_ = new tvs.AnnotatorImpl(
        'underliner',
        tvs.Annotator.getTemplates(),
        tvs.AnnotatorCore.underlinePositioner);

    this.highlighter_ = new tvs.AnnotatorImpl(
        'highlighter',
        tvs.Annotator.getTemplates(),
        tvs.AnnotatorCore.highlightPositioner,
        {opacity: 0.45});

    this.striker_ = new tvs.AnnotatorImpl(
        'striker',
        tvs.Annotator.getTemplates(),
        tvs.AnnotatorCore.strikePositioner);
};
AnnotatorImpl instances are created with different IDs and positioner helper objects. Passed IDs are used later in CSS class names and internal fields names, requiring IDs to be unique. Also, a reference to a list of known templates are passed (can be changed later).
Each positioner object is an implementation of IPositioner interface which have the “getPosition” method only and looks as follows:
/**
 * Underline positioner
 * @implements {tvs.IPositioner}
 */
tvs.AnnotatorCore.underlinePositioner = /** @type {!tvs.IPositioner} */ ({
    /**
     * @param {Object} elementRect
     * @param {number} annotationHeight
     * @return {{left: number, top: number, width: number, height: number}}
     */
    getPosition: function(elementRect, annotationHeight) {
        return {
            width: elementRect.width,
            height: annotationHeight,
            left: elementRect.left,
            top: elementRect.bottom - (elementRect.height * 0.1)
        };
    }
});
This allows every template to be used with underline, highlight, or strike text annotating. When an annotation is applied to an element, the bounding box for the element is obtained by calling “getElementRects” as show below:
var rects = elemOrEv.getClientRects();
This method returns a collection of rectangles that indicate the bounding rectangles for each box in a client. After passing each rect to concrete positioner, we will get destination bounds.
SVG Text Annotation Templates
As mentioned before, there is only one set of templates which are used for all kinds of SVG text annotations. Every template consists of template parts. A template part is an entity which represents the part’s content, template width, and draw mode.
Content
Content is a set of SVG elements represented as a string. Since this content doesn’t have a root SVG node where viewport’s width and height (in pixels) are set, the template’s part constructor accepts them as parameters. For example, you can specify the size of a viewport as 100px x 100px and draw a line to (50, 50) and (25, 25). After the annotation is applied, all svg elements will be sized to the desired size properly. The content value can use the string “{0}” which will be replaced with the color selected by the user.
The following SVG renders a diagonal line. We will be using this as one of the parts in an example annotation style following shortly:
<line x1="0" y1="0" x2="5" y2="5" stroke-width="2" stroke="red" />
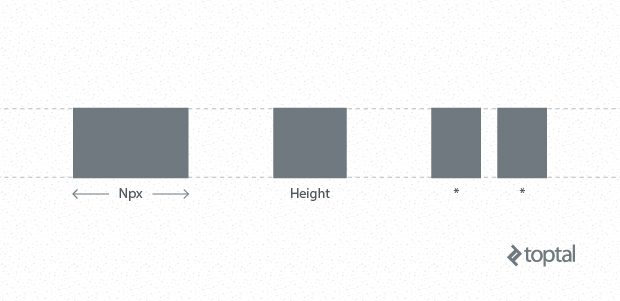
Width
Template width is a string which can be “*”, “height”, or anything else:
-
“*” sets the width of all elements with a star equal to each other
-
“height” sets the width equal to the height of the annotation element
Anything else set here will be directly set to CSS width and min-width properties.
Draw Mode
Draw mode is a string that can be either “repeat” or “stretch”. As the values indicate, setting it to “repeat” will repeat the content, while setting it to “stretch” will stretch the content.
Here is an example of what we can achieve by configuring these three parameters:

The text annotation in the example above contains 4 parts. The first part being the diagonal line, with template width set to “height” and draw mode set to “repeat”. The second part has its template width set to “*” and draw mode set to “repeat”. The third part is set to be “15px” wide and be drawn in “repeat” mode. Finally, the last part’s width is set to “*” and its draw mode is set to “stretch”.
When these widths are evaluated, the first part takes 5 pixels (equal to the height of the annotation element), the third part takes 15 pixels (as set), and the remaining space is equally divided among the second and fourth parts.
When the same piece of text is highlighted using the same template, this is what we get:

As you can tell, the height of the annotation element is greater, and so is the width of the first part (since the template width for that part is set to “height”). Naturally, the third part’s width remained unchanged from the previous example.
Applying a strike-out effect to the same text with the same template produces a result very similar to the first one. The only difference is the location where the annotation elements are positioned:

Even though these text annotations seem complex (the way they look, having four distinct parts), they all use very simple SVG elements. As an additional example, doing a squiggly line requires a single part, with the following, simple SVG content:
var t = new tvs.Template(new tvs.SvgTemplatePart(
    '<line y2="16.00" x2="20" y1="4.00" ' +
        'x1="10" stroke-linecap="round" ' +
        'stroke-width="5" stroke="{0}" fill="none"/>' +
    '<line y2="4.00" x2="10" y1="16.00" ' +
        'x1="0" stroke-linecap="round" ' +
        'stroke-width="5" stroke="{0}" fill="none"/>',
        20, 20, 'repeat'
    ))
When these templates are evaluated, the content is resized and “{0}” is substituted with the specified color automatically. Even more, adding new templates is as simple as adding them to a JavaScript object:
tvs.AnnotatorDictionary.svgTemplates['brush'] = new tvs.Template(new tvs.SvgTemplatePart(
    svgContent, 50, 50, '*', 'stretch'
));
Results
Each annotation is applied by appending a div element with absolute positioning to the page:
<div style="position: absolute; height: 5px; width: 178px; left: 8px; top: 447.2px; opacity: 0.9;" class="tvs-annotate-element">
  <div style="height: 5px; width: 178px;" class="tvs-wrap-div">
    <table>
      <tr>
        <td style="width: 10px; min-width: 10px; background-image: url(data:image/svg+xml;base64,...); background-size: auto 100%;"></td>
        <td style="width: 50%; background-image: url(data:image/svg+xml;base64,...); background-size: auto 100%;"></td>
        <td style="width: 50%; background-image: url(data:image/svg+xml;base64,...); background-size: auto 100%;"></td>
      </tr>
    </table>
  </div>
</div>
The div element is populated with a table where every cell added corresponds to one of the parts in the template. The content of each template part is added as Base64 encoded data URI, with the selected color applied:
tvs.SvgTemplatePart.prototype.getBackground = function(color) {
    var image = tvs.AnnotatorCore.formatString(this.content, [color]);
    var encodedSVG = goog.crypt.base64.encodeString(image);
    return 'data:image/svg+xml;base64,' + encodedSVG;
};
Embedding
For a better user experience, especially when trying to use this JavaScript library with editable content areas, it is important for the Text Annotator to know the bounds of text currently selected by the user. Rangy, a neat JavaScript library dealing with range and selection, has been used to achieve this in a cross-browser manner. Rangy provides a simple standards-based API for performing common DOM Range and Selection tasks in all major browsers, abstracting away the wildly different implementations of this functionality between Internet Explorer up to DOM-compliant browsers. It is the only dependency of the project.
Once Text Annotator is embedded, using it is a very simple feat:
var annotator = new tvs.Annotator();
annotator.underlineSelected();
Each annotated element is marked with “tvs-annotated-text” class and each annotation element has “tvs-annotate-element” class. Removing annotations is even simpler, a one-liner:
annotator.unannotateElement(annotatedElement);
Quirks
When the window is resized, elements may move around, requiring annotated elements to be “refreshed”. This is handled by the library. However; to reduce impact on performance, the call to refreshing annotations is throttled:
tvs.AnnotatorImpl = function(id, templates, positioner, options) {
   // ...
   this.throttle = new goog.Throttle(goog.bind(this.refreshAllAnnotations, this), 50);
   tvs.AnnotatorCore.registerForWindowResize(
       this.id,goog.bind(this.throttle.fire, this.throttle));
};

tvs.AnnotatorImpl.prototype.refreshAllAnnotations = function() {
    var elems = goog.dom.getElementsByClass(this.getCssClassForAnnotated());
    var refFunc = goog.bind(this.refreshAnnotation, this);
    goog.array.forEach(elems, refFunc);
};
Upon refresh, annotation elements may be added, resized, or removed from the page as required.
Convenience
To make it easier to annotate static text on a page, a simple data attribute on the container element is all you need:
data-annotate='underline squiggly green'
This will annotate the content of the element with a squiggly green underline.
Conclusion
What more can I say about this SVG text tutorial? A fun yet powerful tool has been easily implemented. I do not think we would benefit much by ensuring support for Internet Explorer 8, as we instead may end up complicating the whole implementation. However, with some improvements and a little work on the core, we can extend the library to be able to produce decorative borders for non-textual elements. Furthermore, it may be an interesting task to implement some mechanism to save and later restore the state of an annotation’s editable content.
As for now, the possibilities are only limited by your imagination (and browser capabilities). Perhaps you want microprint lines, or gradients, or even animations. With Text Annotator, you can.
Tomsk, Tomsk Oblast, Russia
Member since December 8, 2014
About the author
Anton is a software developer and technical consultant with 10+ years of experience in desktop-distributed applications.